Amazon Bedrock AgentCore Gateway provides a centralized layer for managing how AI agents connect to tools and MCP servers across your organization. It consolidates authentication, observability, and policy enforcement into a single endpoint, removing the need to configure and secure each MCP server connection individually.
In this post, we walk through how to configure AgentCore Gateway to connect to an OAuth-protected MCP server using the Authorization Code flow.
Using AgentCore Gateway as an MCP server endpoint
As organizations scale their AI agent deployments, the number of MCP servers that each team relies on grows quickly. Developers are adopting Amazon Bedrock AgentCore Gateway as a single endpoint for accessing multiple MCP servers. Instead of configuring each MCP server individually per IDE, teams point to one Gateway URL for consistent access to their full MCP toolset across tool.
This pattern is accelerating as teams move beyond custom MCP servers and adopt production-grade third-party ones, like those from AWS, GitHub, Salesforce, and Databricks. Many of these MCP servers are protected by their primary identity provider through federation, while others are secured by their own authorization servers. As the number of MCP servers per organization grows, managing connections, authentication, and routing at the IDE level becomes unsustainable. AgentCore Gateway centralizes this complexity, giving teams a single control plane for MCP access while giving developers a frictionless experience.
Many enterprise MCP servers require OAuth 2.0 authorization, where the agent must authenticate on behalf of a user before invoking tools. AgentCore Gateway now supports the OAuth 2.0 Authorization Code flow through Amazon Bedrock AgentCore Identity. With this, your agents can securely access protected MCP servers without embedding credentials in application code or managing the token lifecycle manually.
Key terms
- AgentCore Gateway user – The end user who consumes the tools in Amazon Bedrock AgentCore Gateway with MCP clients. Gateway users don’t manage the AgentCore Gateway itself. They use the single AgentCore Gateway URL to access the tools available to them.
- Admin user – The user that manages and maintains Amazon Bedrock AgentCore Gateway. This user is responsible for attaching MCP servers, tools, or APIs to the AgentCore Gateway so that AgentCore gateway users can consume them.
- MCP server – In this post, we assume that the MCP server is protected by an OAuth 2.0 Authorization Code flow, which requires user interaction to complete authentication. This is distinct from machine-to-machine authentication methods such as Client Credentials or Token Exchange, where no user intervention is required. The patterns described in this post apply specifically to MCP servers that require user-delegated authorization.
How Authorization Code flow works
To provide support for the Authorization Code Grant type, we provide two ways for target creations.
- Implicit sync during MCP Server target creation
In this method, the admin user completes the authorization code flow during CreateGatewayTarget, UpdateGatewayTarget, or SynchronizeGatewayTargets operations. This allows AgentCore Gateway to discover and cache the MCP server’s tools upfront.
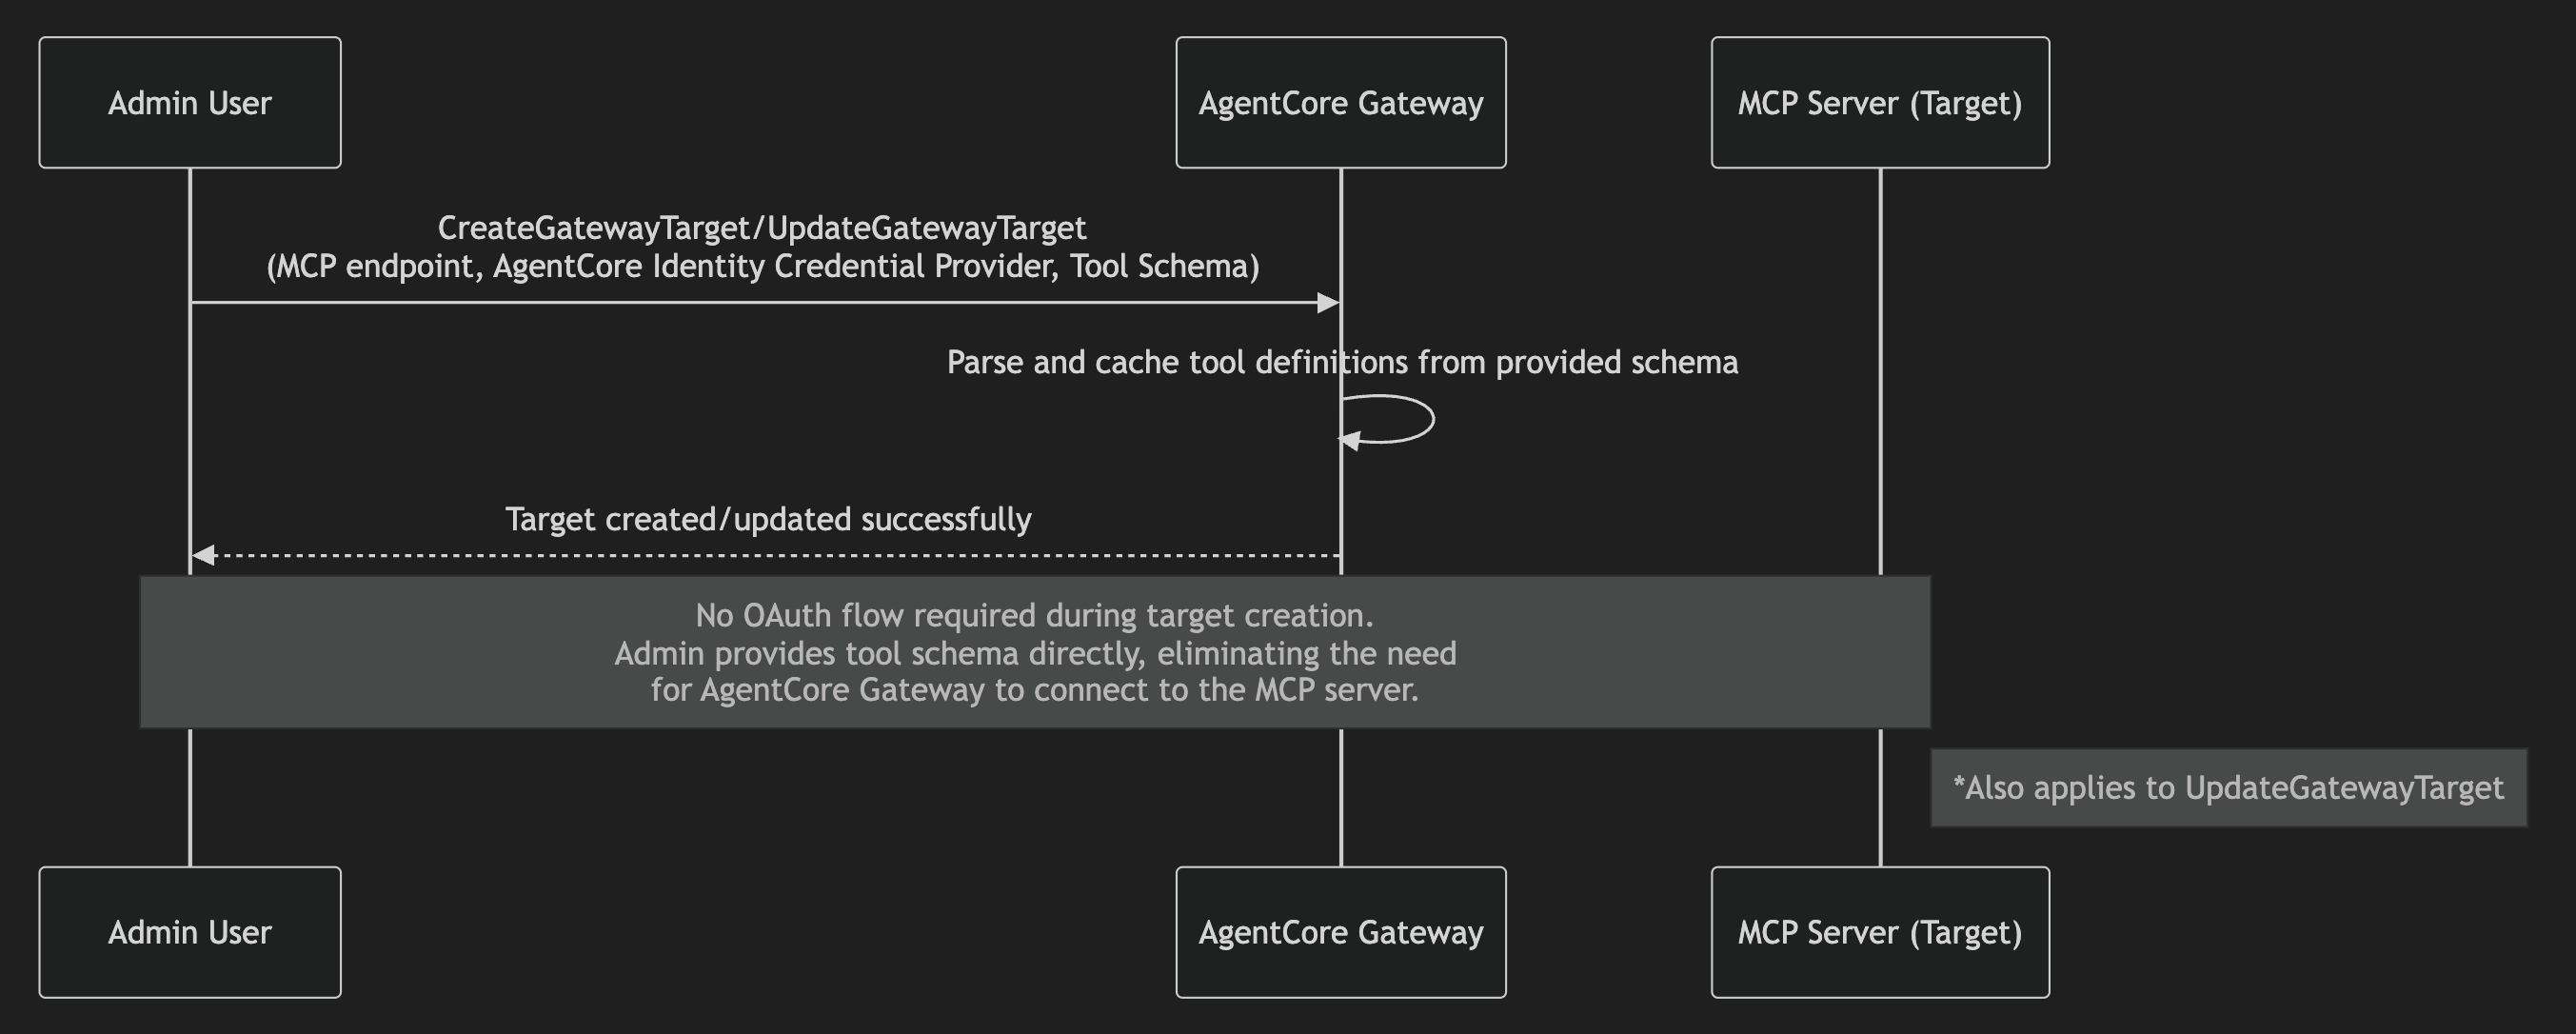
- Provide schema upfront during MCP Server targets creation
With this method, admin users provide the tool schema directly during CreateGatewayTarget or UpdateGatewayTarget operations, rather than AgentCore Gateway fetching them dynamically from the MCP server. AgentCore Gateway parses the provided schema and caches the tool definitions. This removes the need for the admin user to complete the authorization code flow during target creation or update. This is the recommended approach when human intervention isn’t possible during create/update operations. This method is beneficial when you don’t want to expose all the tools provided by the MCP server target.
Note: Because tool schemas are provided upfront with this method, the SynchronizeGatewayTargets operation isn’t supported. You can switch a target between Method 1 and Method 2 by updating the target configuration.
This means that AgentCore Gateway users can call list/tools without being prompted to authenticate with the MCP server authentication server, because this fetches the cached tools. The authorization code flow is only triggered when a Gateway user invokes a tool on that MCP server. This is particularly beneficial when multiple MCP servers are attached to a single Gateway. Users can browse the full tool catalog (cached tools) without authenticating to every MCP server and only complete the flow for the specific server whose tool they invoke.
URL Session Binding
URL session binding verifies that the user who initiated the OAuth authorization request is the same user who granted consent. When AgentCore Identity generates an authorization URL, it also returns a session-URI. After the user completes consent, the browser redirects back to a callback URL with the session-URI. The application is then responsible for calling the CompleteResourceTokenAuth API, presenting both the user’s identity and the session-URI. AgentCore Identity validates that the user who started the flow is the same user who completed it before exchanging the authorization code for an access token. This helps avoid a scenario where a user accidentally shares the authorization URL, and someone else completes the consent, which would grant access tokens to the wrong party. The authorization URL and session URI are only valid for 10 minutes, further limiting the window for misuse. Session binding applies during admin target creation (implicit sync) and during tool invocation.
Solution overview
In this post, we show how to attach the GitHub MCP server to Amazon Bedrock AgentCore Gateway using Method 1 (admin-initiated sync during target creation) and Method 2 (providing the tool schema upfront during target creation). The accompanying code is available in this repository.
Prerequisites
You must follow the following prerequisites along with this post.
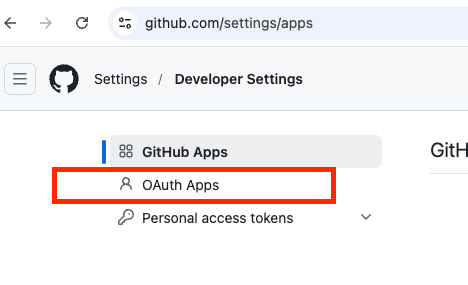
- GitHub OAuth Apps setup
- Go to https://github.com/settings/apps → New GitHub App
- Fill in details:
- GitHub App name: AgentCore Gateway GitHub MCP
- Homepage URL (The full URL to your GitHub App’s website): The Homepage URL appears as a clickable link when user see your OAuth app, letting them learn more about your app. It helps users verify the legitimacy of the app requesting access to their GitHub account.
- Authorization callback URL: The Authorization callback URL (redirect URI) is the URL GitHub redirects the user to after they authorize (or deny) your OAuth app. For now, let’s put
https://example.com/auth, we will come back and change this value. - Advanced Settings: Here we go over the recommended defaults. However, please ensure to follow security best practices based on your organizations polices.
- Expire user authorization tokens: Disable – If enabled, this will allow AgentCore Identity to automatically refresh tokens for the user.
- Request user authorization (OAuth) during installation: Disable.
- Device Flow: Disable – Allows authorization on devices that don’t have a browser (for example, CLI tools, smart TVs, CI environments).
- Webhook: Disable.
- User permissions: Use case dependent, keep it default for now – These are granted when the user goes through the OAuth authorization flow. Only request what you need, users see these permissions on the consent screen and excessive permissions reduce trust.
- Go to https://github.com/settings/apps → New GitHub App
-
- Choose Create GitHub App.
- Make sure to note down the app Client ID (different to the App ID).
- Under your Oauth app general settings, choose Generate a new client secret. Make sure to note down the client secret as GitHub only shows it once upon creation.
- IAM permissions: You need appropriate IAM permissions to run the code from this blog post. These are the minimum IAM permissions required.
- Code repository: First clone the GitHub repository, and then open
github-mcp-server.ipynb. We recommend following the console instructions on this blog post to understand the concepts and then look at the code walkthrough. - GitHub credential provider: In this step we will setup Agentcore Identity Credential Provider. On the Amazon Bedrock AgentCore console, go to AgentCore Identity and create an OAuth client.
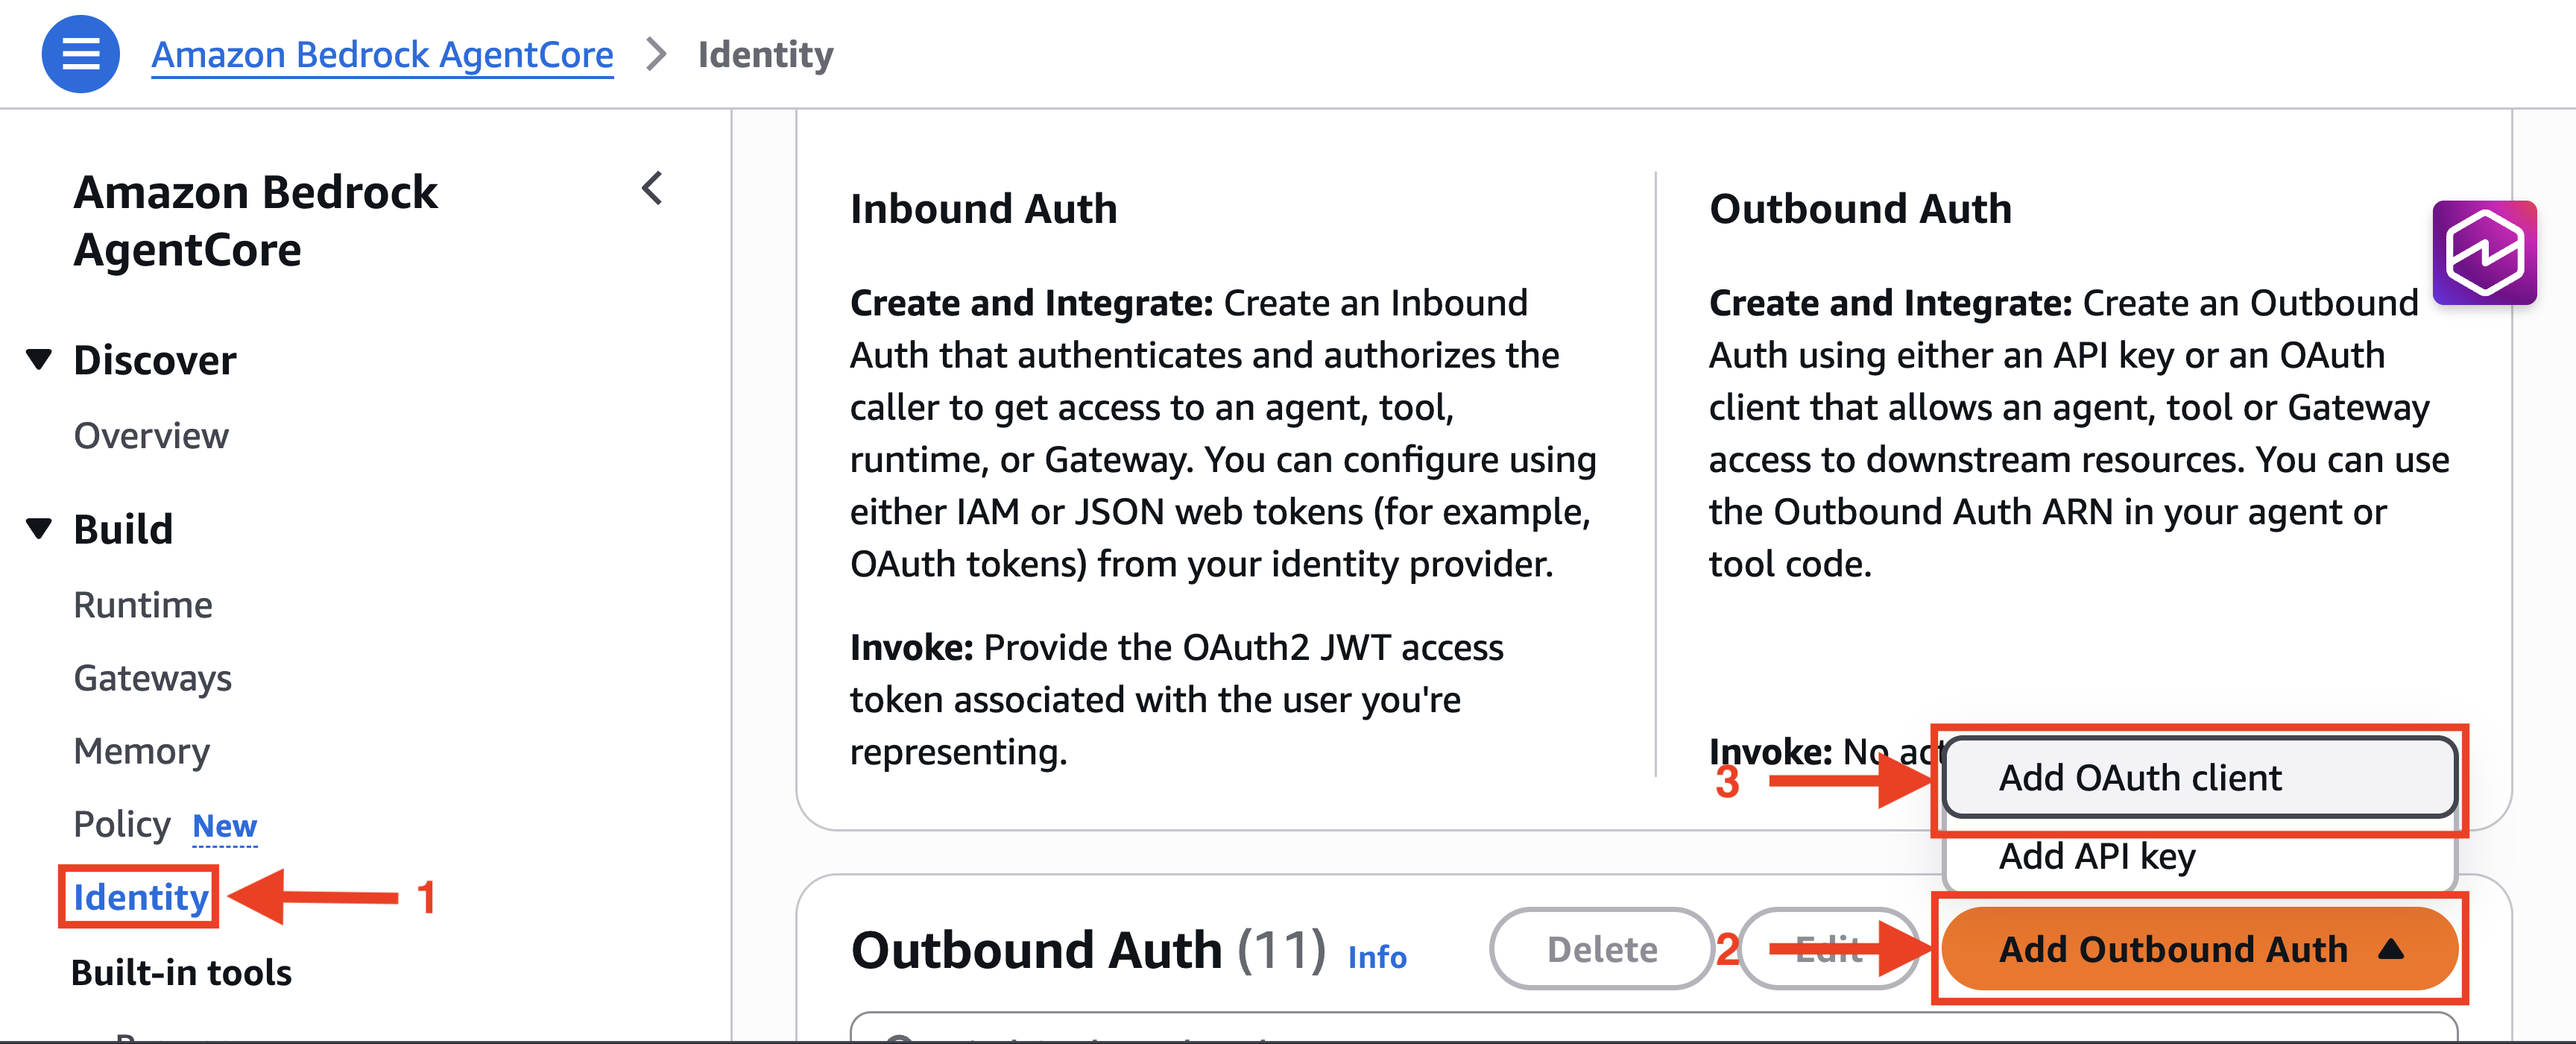
- Provide a name for the OAuth Client, choose the included GitHub provider, and fill in the GitHub OAuth App client ID and client secret.
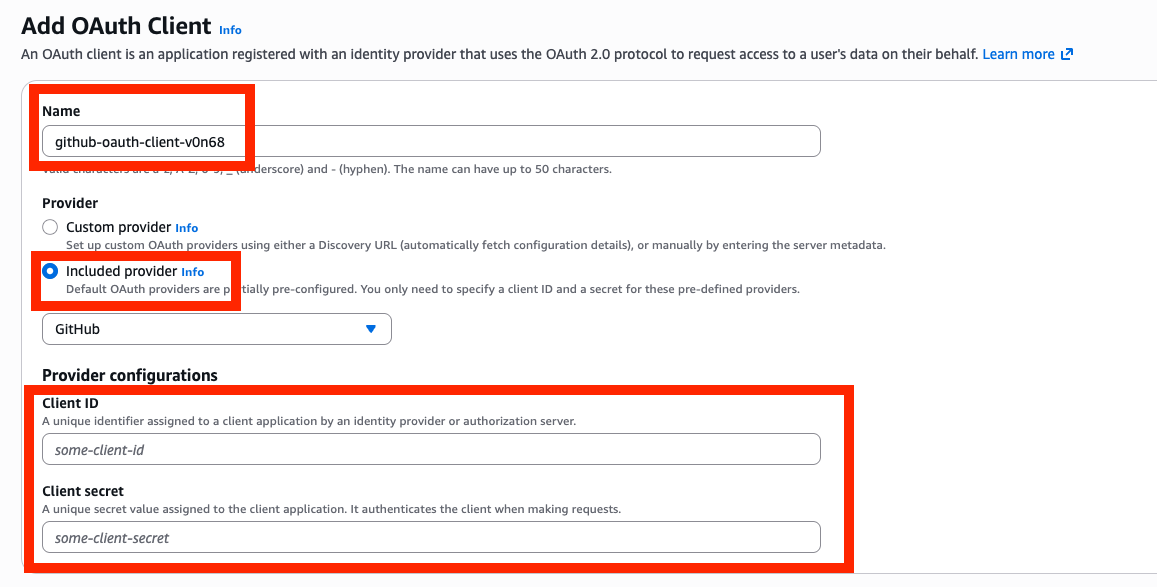
- Copy the AgentCore Identity OAuth client callback URL, and make sure to go back to GitHub OAuth provider you created and update the Authorization callback URL.

- Provide a name for the OAuth Client, choose the included GitHub provider, and fill in the GitHub OAuth App client ID and client secret.
Implicit sync during MCP Server target creation
In this section, we will introduce how implicit sync during MCP Server target creation works. Make sure that the AgentCore Gateway execution role has GetWorkloadAccessTokenForUserId and CompleteResourceTokenAuth permissions. First, let’s start by understanding the flow.
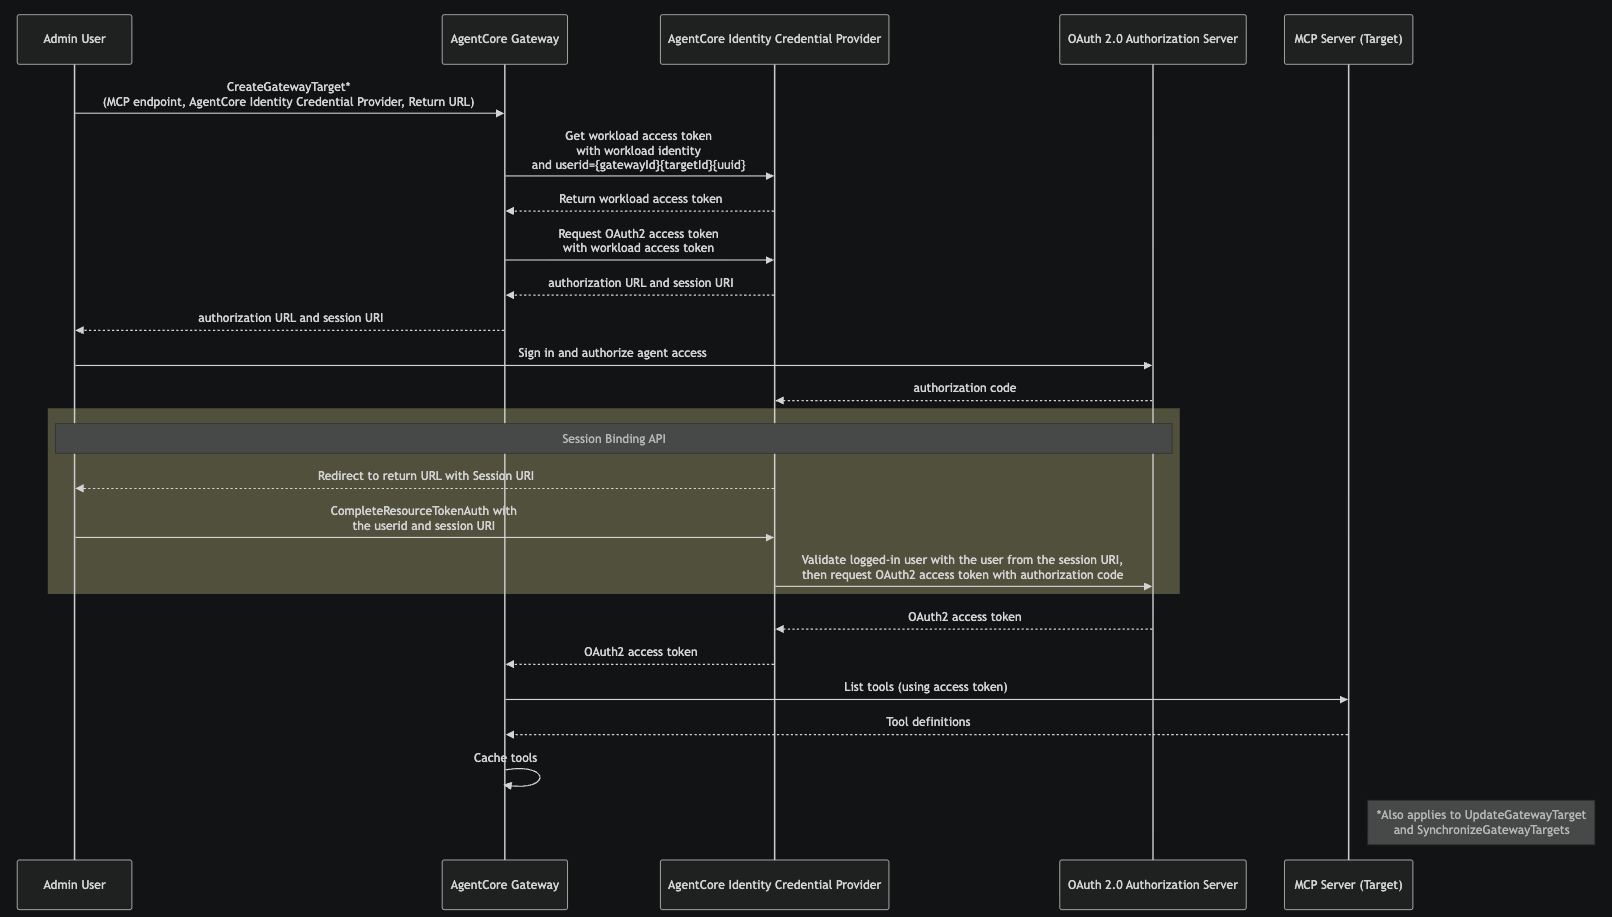
- The admin user calls
CreateGatewayTarget, providing the MCP server endpoint, the AgentCore Identity Credential Provider, and return URL. This tells AgentCore Gateway which MCP server to connect to and which credential provider to use for obtaining OAuth 2.0 tokens. This same flow also applies toUpdateGatewayTargetandSynchronizeGatewayTargetsoperations. - AgentCore Gateway requests a workload access token from the AgentCore Identity Credential Provider, passing the AgentCore Gateway workload identity and a user ID in the format
{gatewayId}{targetId}{uuid}. This workload access token identifies the AgentCore Gateway as an authorized caller for subsequent credential operations. - Using the workload access token, AgentCore Gateway requests an OAuth 2.0 access token from the AgentCore Identity Credential Provider. This provides the admin user with an authorization URL and a session-URI. At this stage, the target is in Needs Authorization status.
- The admin opens the authorization URL in their browser, signs in, and grants the requested permissions to the AgentCore Gateway.
- After the admin grants consent, the OAuth 2.0 authorization server sends an authorization code to the AgentCore Identity Credential Provider’s registered callback endpoint.
- The credential provider redirects the admin browser to the return URL, with the session URI. The admin application calls
CompleteResourceTokenAuth, presenting the user id and the session-URI returned in step 2. The credential provider validates that the user who initiated the authorization flow (step 3) is the same user who completed consent. This revents token hijacking if the authorization URL was accidentally shared. If the flow was initiated from the AWS Console, this step is handled automatically. If initiated from another context, the admin is responsible for calling theCompleteResourceTokenAuthAPI directly. - After successful session binding validation, the credential provider exchanges the authorization code with the OAuth 2.0 authorization server for an OAuth 2.0 access token.
- This access token is used to list the tools on MCP server target; returned tool definitions from the target are cached at AgentCore Gateway.
Note that a subsequent update or synchronization to the target won’t reuse the access token. Instead, AgentCore Identity will get a new access token from Authorization Server.
Target creation
First, let’s start by creating an Amazon Bedrock AgentCore Gateway and Target and see how implicit sync works during MCP Server target creation.
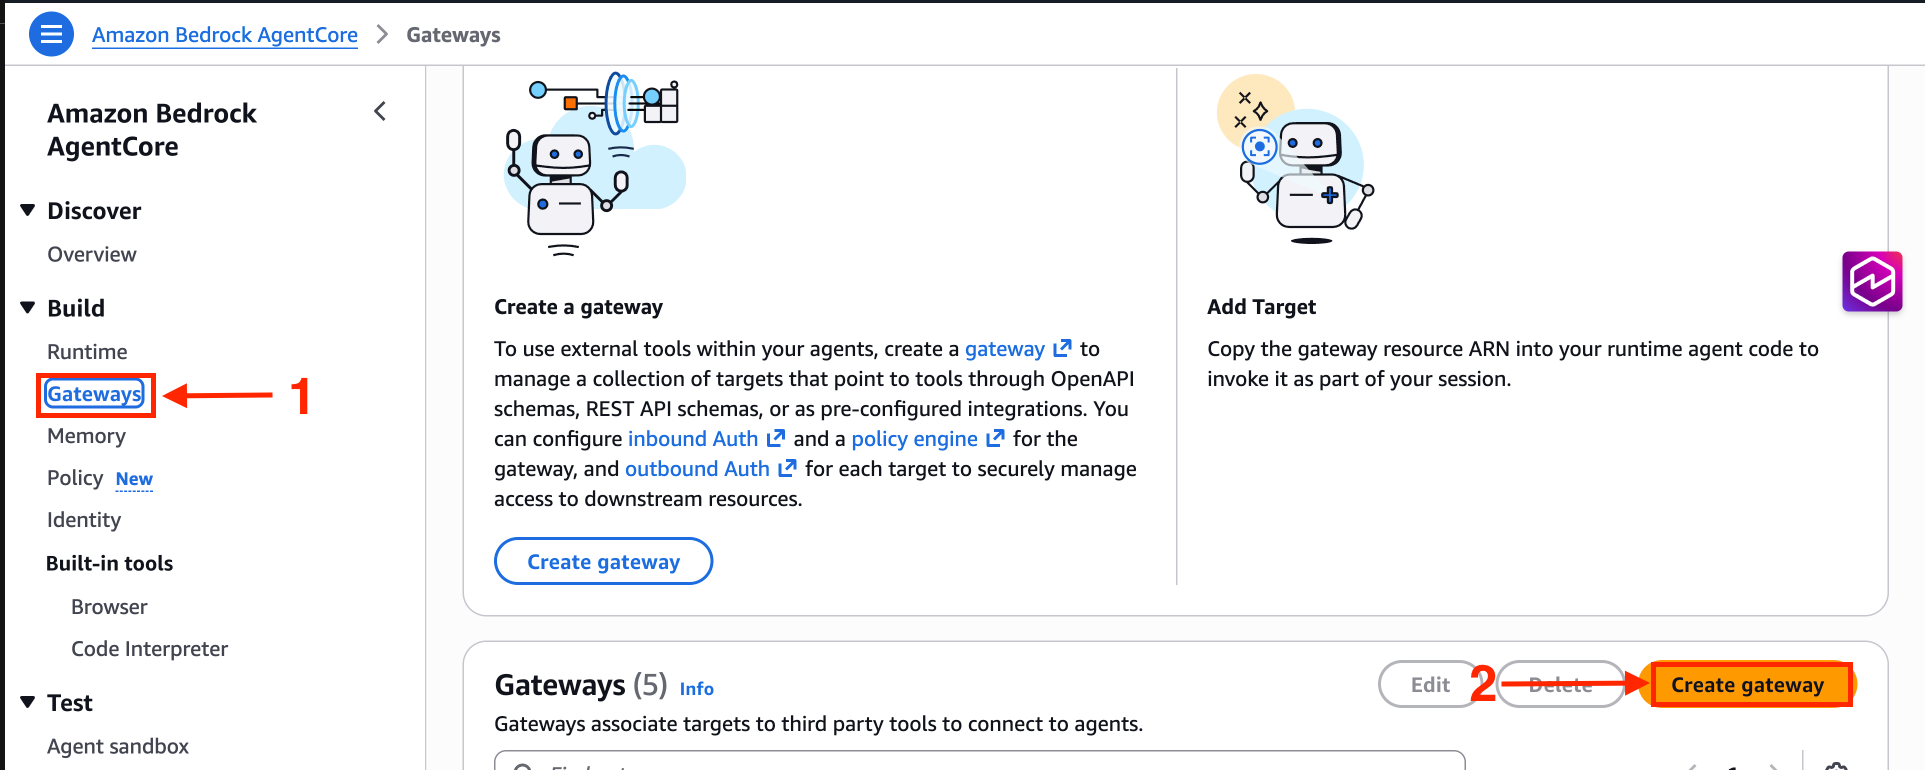
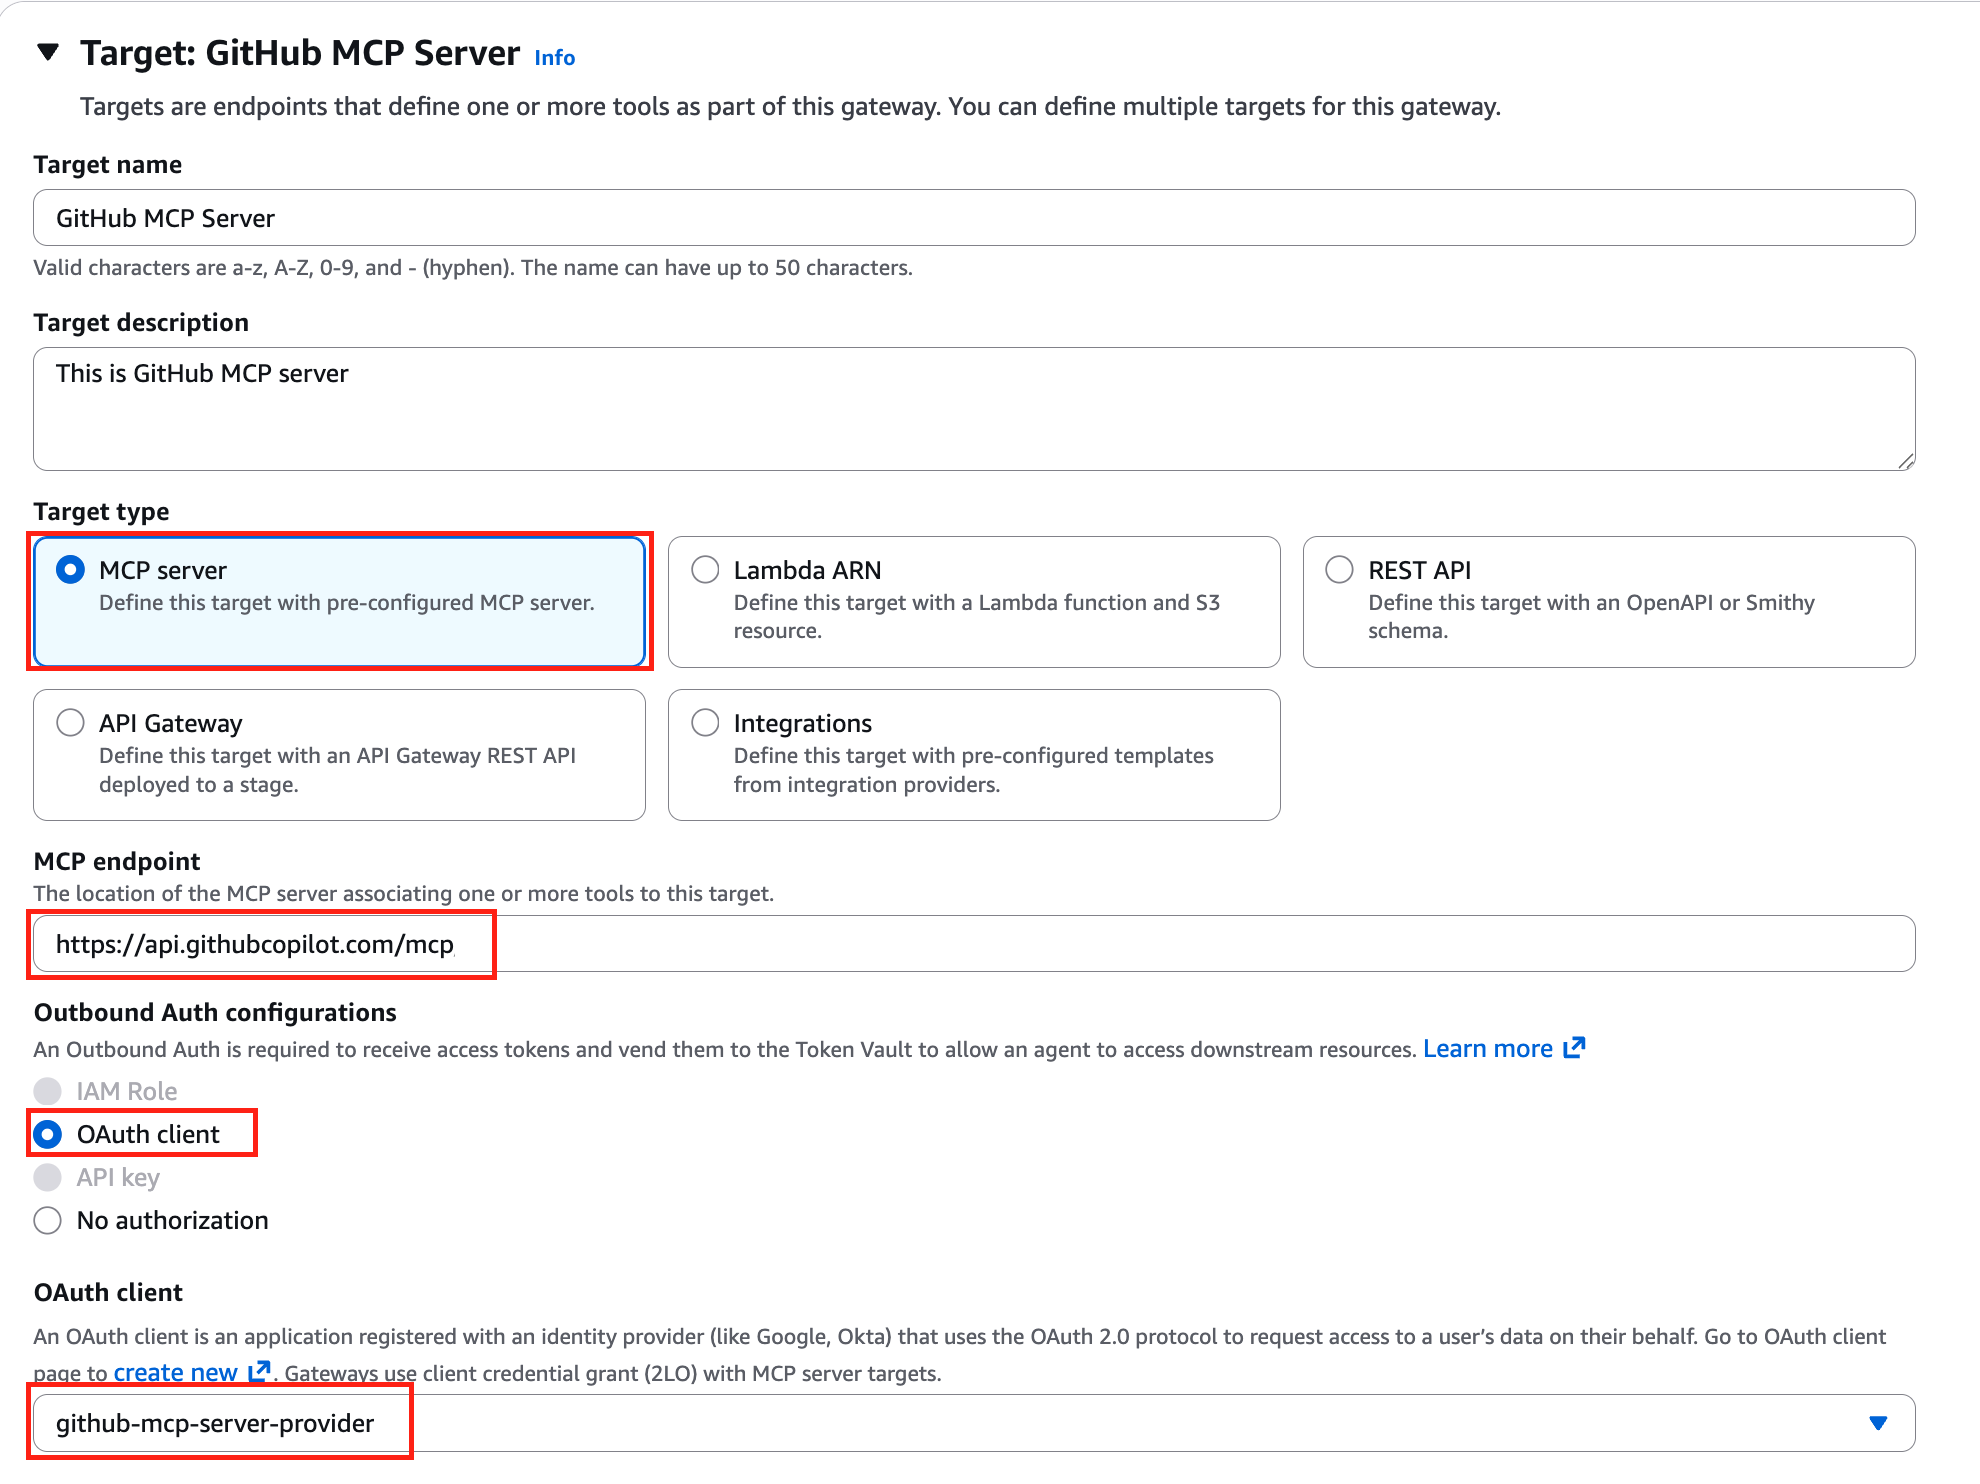
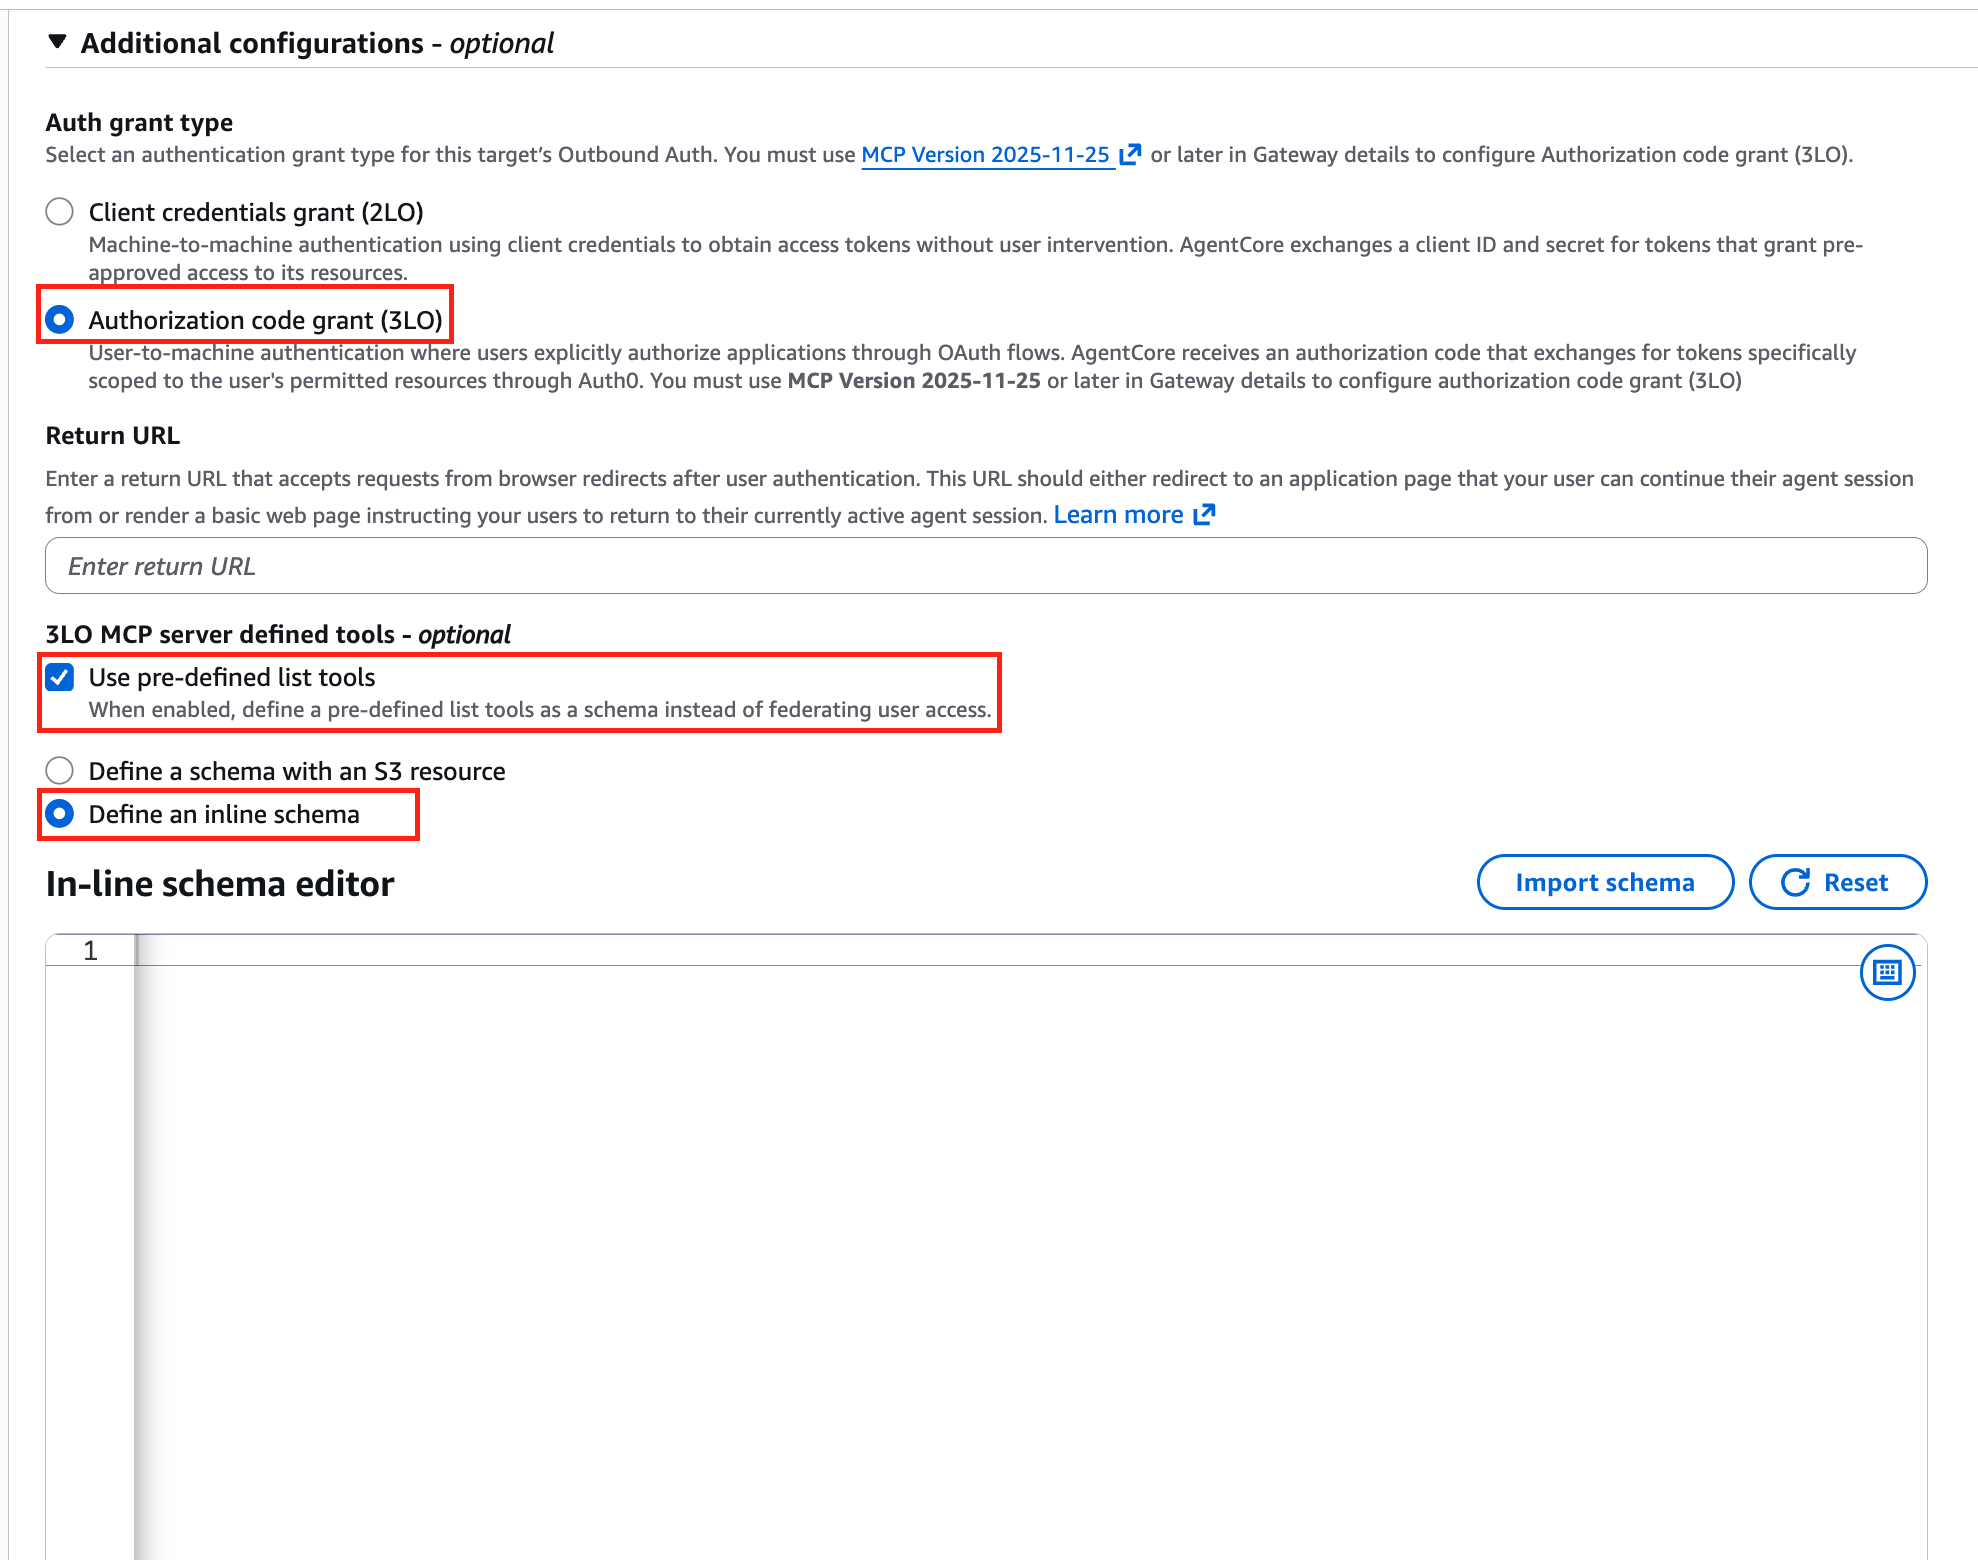
When creating an AgentCore Gateway, you must use MCP version 2025-11-25 or later. Keep everything else default and select MCP server target. Provide the MCP server endpoint, and for OAuth client, select the AgentCore Identity OAuth Client created during the prerequisites section.
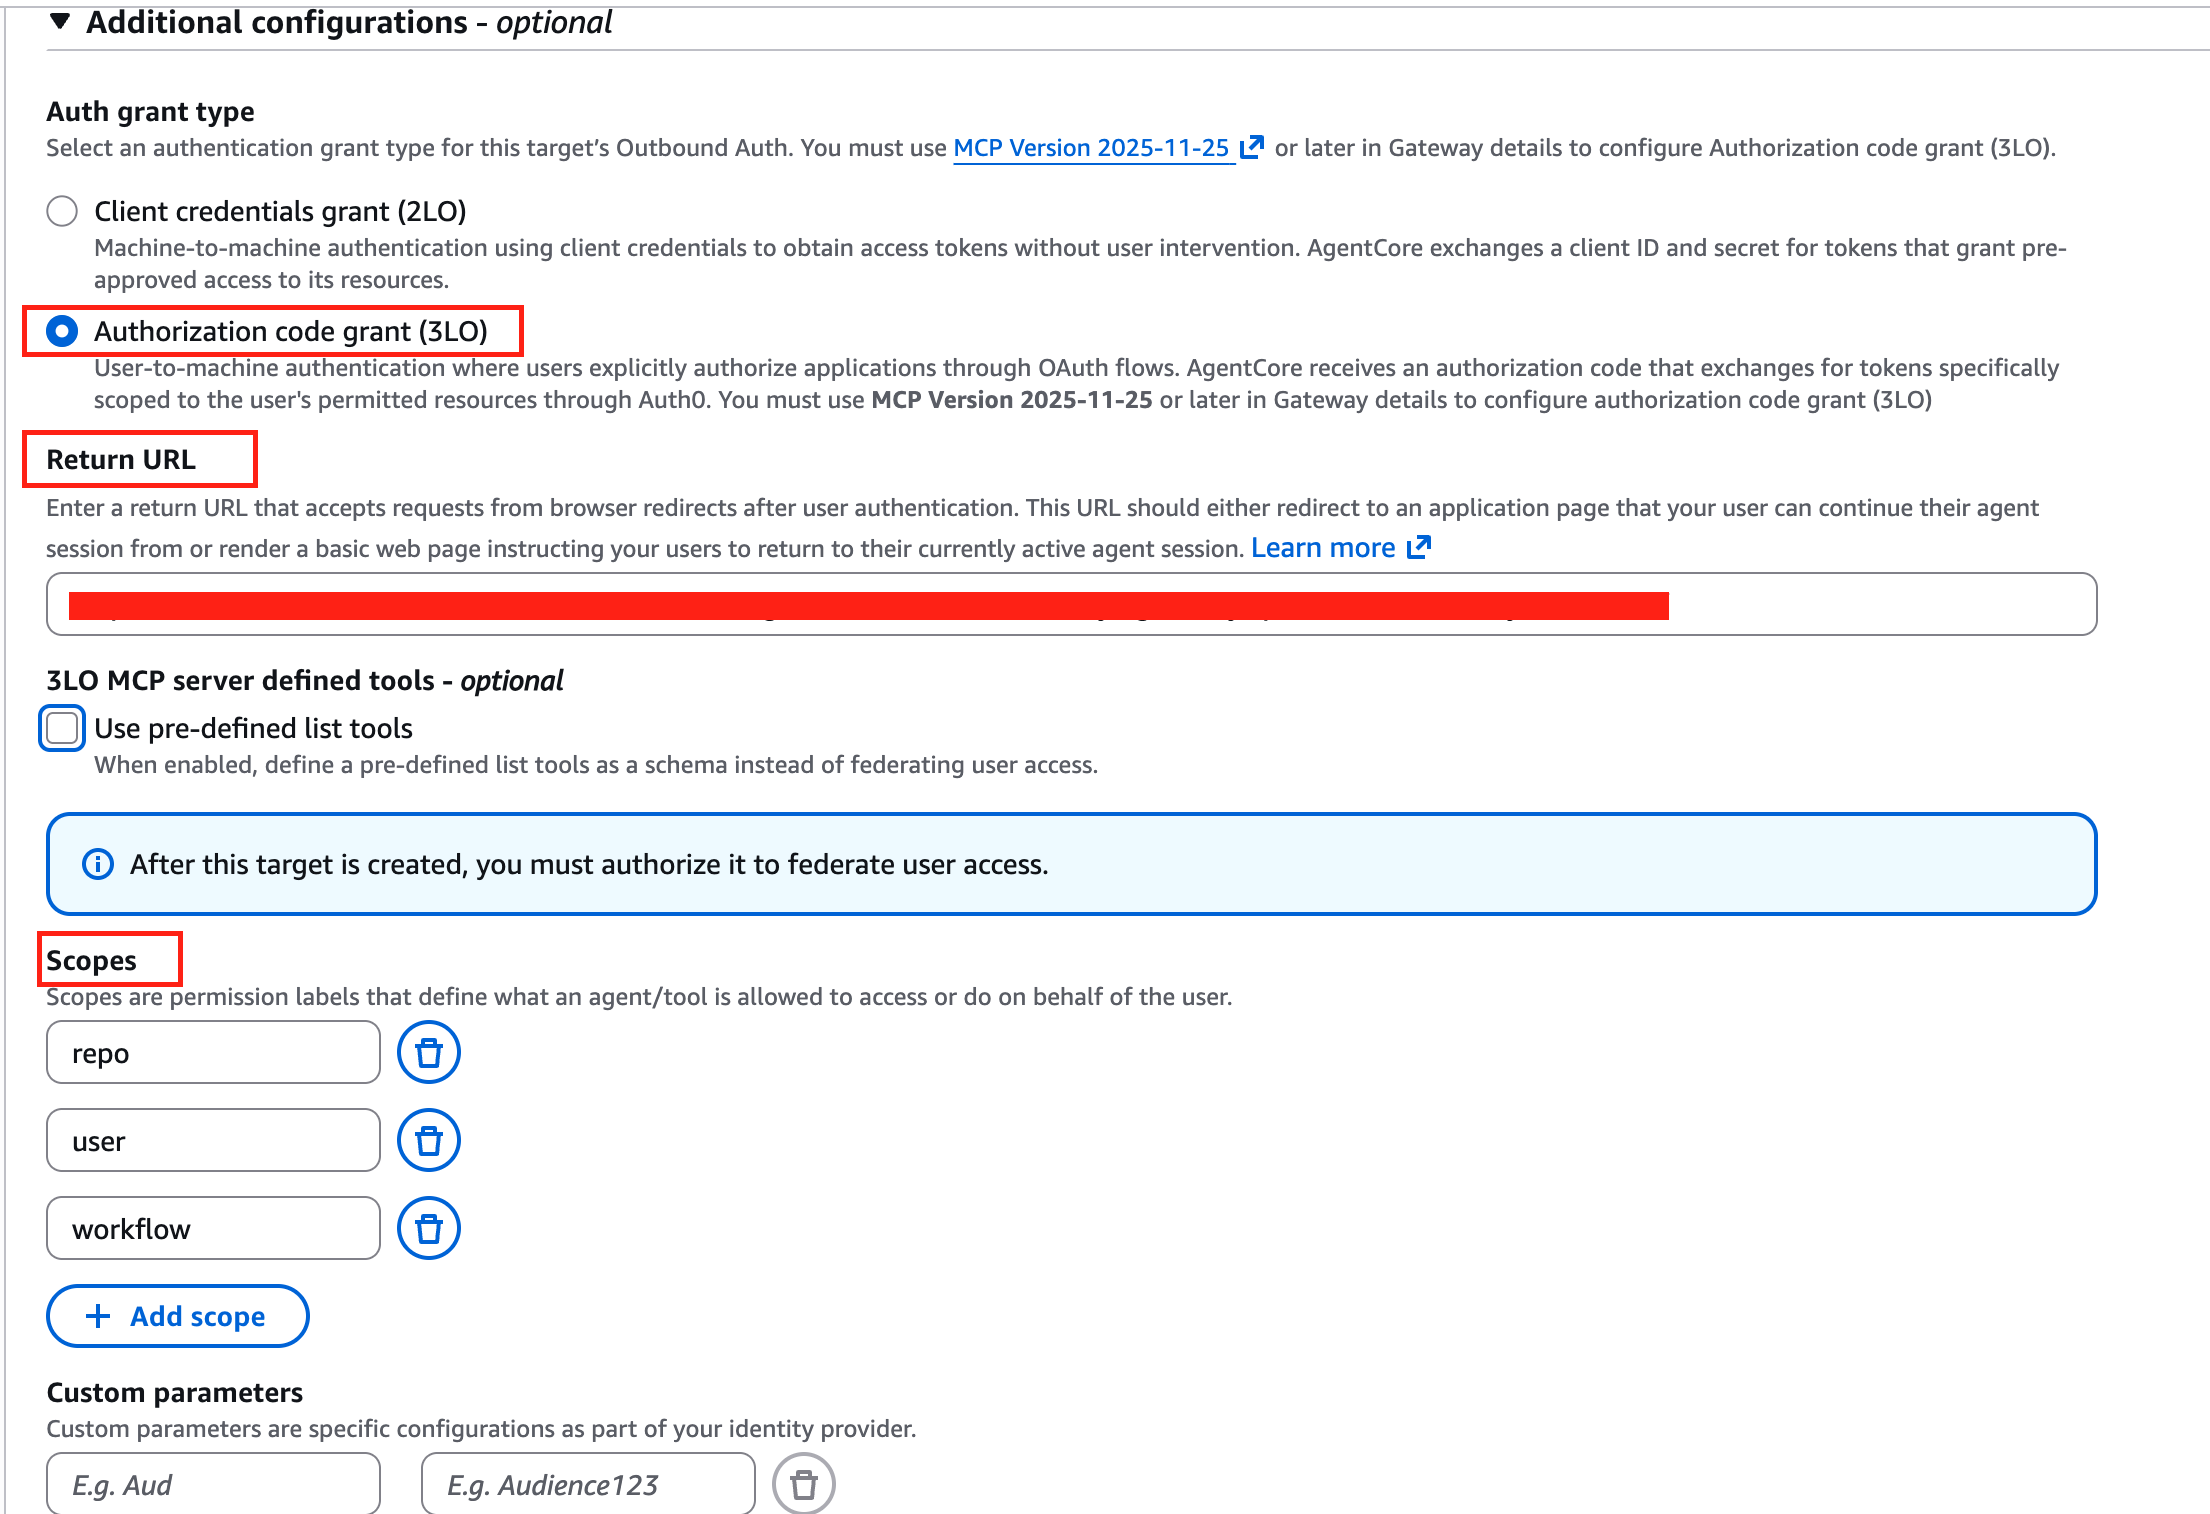
Under additional configuration, make sure to select Authorization code grant (3LO). The Authorization code grant (3LO) option will be disabled if the AgentCore Gateway wasn’t created with MCP version 2025-11-25 or later. Here, you must also provide the return URL. During the session binding process after the authorization code flow, users will be returned to this URL, both during implicit sync and tool invocation. You can override the return URL value during invocation. For more information, see Example: Authorization code grant in the Amazon Bedrock AgentCore Developer Guide. You can provide scopes and additional parameters such as audience when configuring the target. These parameters are included in the request when AgentCore Identity reaches out to the authorization server’s /authorize endpoint.
After creating the target, the target will be in Needs authorization status. At this point, admin users are required to complete the authorization request, either directly from the AWS console or by navigating to the authorization URL directly. It’s important to note that if the flow is completed from the AWS console, session binding is handled automatically. If initiated from another context, the admin is responsible for calling the CompleteResourceTokenAuth API directly. For more information, see the code sample in GitHub.

This is how the consent flow looks like when initiated from the AWS Console.
After a few seconds you will see the target is in Ready status with authorization status Authorized.

Provide schema upfront during MCP Server targets creation
In this section, we introduce how to provide the schema upfront during MCP Server targets creation. This is the recommended approach when human intervention isn’t possible during create/update operations.
In this step, we create an Amazon Bedrock AgentCore Gateway and Target and provide schema upfront during the MCP Server targets creation. The process remains the same. During target creation selection, select Use pre-defined list tools and paste the GitHub tools definitions. You can copy the tool definition from the GitHub repository.
The target in this case becomes immediately ready, with authorization status No authorization required.

Demo
After successful target creation, either using the implicit sync method or by providing the schema upfront, AgentCore Gateway users can discover and invoke tools using the MCP protocol. In this section, we look at the tools/list and tools/call flows from AgentCore Gateway.
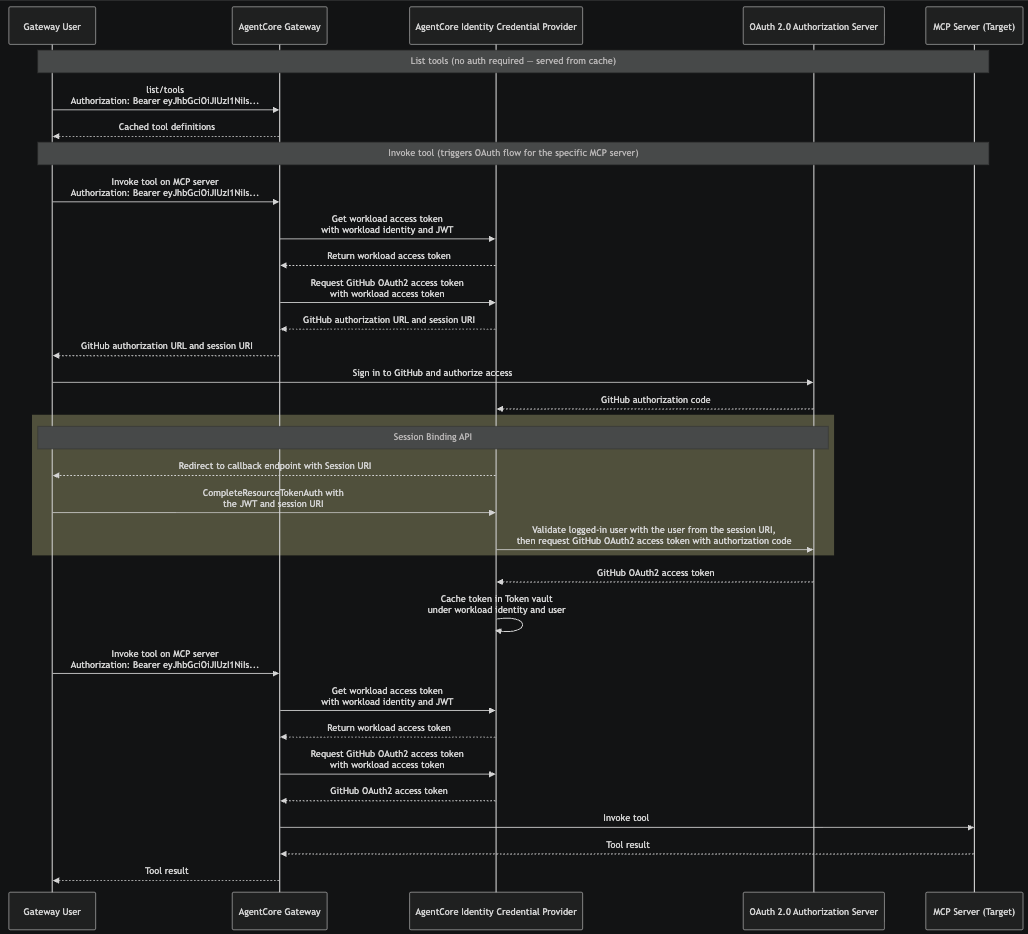
- The gateway user sends a
tools/listrequest to AgentCore Gateway with their inbound authorization token. Because tool definitions were cached during target creation, AgentCore Gateway returns the cached tool definitions immediately. - The gateway user sends
tools/callrequest to AgentCore Gateway with their inbound authorization token. This triggers the OAuth authorization code flow for the specific MCP server target, because AgentCore Gateway needs an access token to call the MCP server on behalf of this user. - AgentCore Gateway requests a workload access token from AgentCore Identity, passing the workload identity and the user’s JWT from the inbound authorization header.
- Using the workload access token, AgentCore Gateway requests an OAuth 2.0 access token from the credential provider. Because no valid token exists yet for this user, the credential provider returns an authorization URL and a session-URI instead.
- AgentCore Gateway passes the authorization URL and session URI back to the gateway user. The user opens the authorization URL in their browser, signs in to the OAuth 2.0 authorization server, and grants the requested permissions. The sample URL elicitation response from AgentCore Gateway is as follows:
- After the user grants consent, the OAuth 2.0 authorization server sends an authorization code to the AgentCore Identity Credential Provider’s registered callback endpoint.
- The credential provider redirects the user’s browser to the return URL with the session URI. The user’s application calls CompleteResourceTokenAuth, presenting the user’s JWT and the session-URI. The credential provider validates that the user who initiated the authorization flow (Step 4) is the same user who completed consent.
- After successful session binding validation, the credential provider exchanges the authorization code with the OAuth 2.0 authorization server for an OAuth 2.0 access token. The credential provider caches this token in the Token Vault under the workload identity and user identity.
- When the gateway user issues a tools/call request again, AgentCore Gateway gets the cached token, using workload identity and user identity, from AgentCore Identity and uses that to call the MCP server.
Let us now look at a demo of the end-to-end flow where we send tools/list and tools/call requests to AgentCore Gateway.
Clean up
When you’re done using this solution, make sure to clean up all the resources. Follow the instructions in the code repository.
Conclusion
In this post, we demonstrated how to connect an OAuth-protected MCP server to Amazon Bedrock AgentCore Gateway using the Authorization Code flow. By centralizing authentication through AgentCore Gateway, teams can manage credentials securely using Amazon Bedrock AgentCore Identity while giving developers seamless access to protected tools from MCP client.
While this example focuses on the GitHub MCP server, the code repository includes integration examples for other popular third-party MCP servers, and a guide for hosting your own MCP server with authorization code flow support on AgentCore Runtime as an AgentCore Gateway target. We encourage you to explore these examples and adapt them to your organization’s MCP server landscape.
Resources
To learn more, refer to the following resources:
- Introducing Amazon Bedrock AgentCore Gateway: Transforming enterprise AI agent tool development
- Introducing Amazon Bedrock AgentCore Identity: Securing agentic AI at scale
- Amazon Bedrock AgentCore Samples
- OAuth 2.0 authorization URL session binding
About the authors