Many organizations need to manage file uploads across different cloud storage systems while maintaining security and compliance. Although Google Drive provides APIs for integration, organizations often don’t have the technical experts to interact with these APIs directly. Organizations need an intuitive way to handle file uploads using natural language, without requiring specialized knowledge of the underlying systems or APIs.
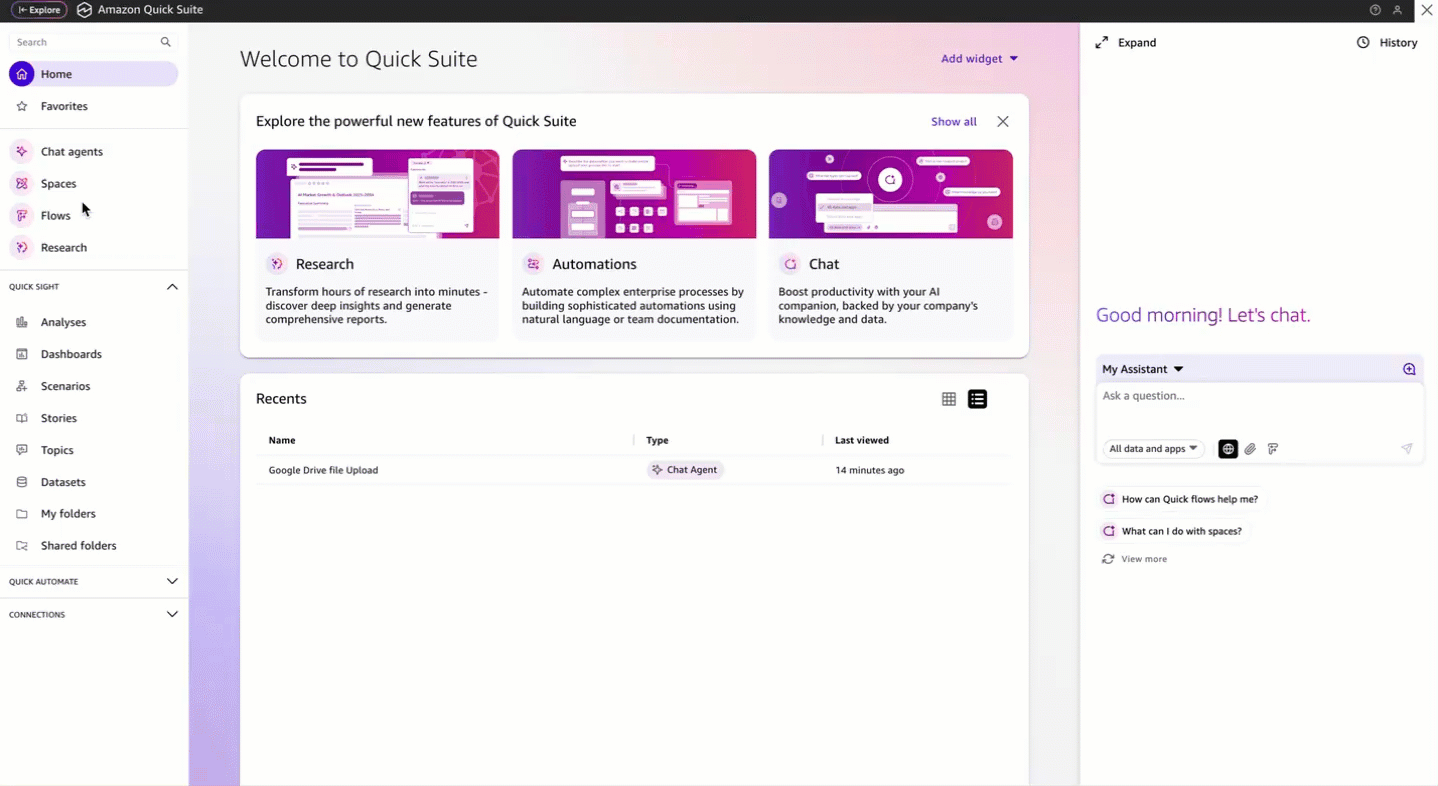
Amazon Quick Suite is an enterprise AI platform that provides generative AI-powered capabilities for workplace productivity and business intelligence. It brings AI-powered research, business intelligence, and automation capabilities into a single workspace and can tackle a wide range of tasks—from answering questions and generating content, to analyzing data and providing strategic insights. To extend its capabilities beyond basic data searching, Amazon Quick Suite offers action connectors, powerful components that allow interaction with external enterprise systems. With these action connectors, users can perform actions and access information from various business tools while staying within the Amazon Quick Suite interface.
Amazon Quick Suite supports external service connectors, AWS service connectors, and custom connectors. External service connectors provide ready-to-use integrations with common enterprise applications, helping organizations quickly implement standard functionalities. However, for specialized needs like integrating with Google Drive or building custom workflows like uploading a file to a drive, Amazon Quick Suite offers custom connectors that helps organizations to execute complex tasks through simple conversational commands and create a unified workspace by connecting various tools through OpenAPI specifications, alleviating the need to constantly switch between different interfaces.
This approach significantly reduces the technical barrier to entry for organizations while making sure they maintain control over security and access permissions. By using Amazon Quick Suite custom connectors, organizations can transform file management operations into simple, conversation-based interactions that authorized user can perform.
In this post, we demonstrate how to build a secure file upload solution by integrating Google Drive with Amazon Quick Suite custom connectors using Amazon API Gateway and AWS Lambda.
Solution overview
This solution addresses common challenges organizations face when managing file operations across cloud storage systems, such as maintaining security compliance, managing user permissions, and reducing the technical barriers for users. With the natural language understanding capabilities and custom connectors available in Amazon Quick Suite, organizations can transform Google Drive operations into simple, conversation-based interactions while supporting secure file uploads to the folders the user has access to. The solution demonstrates the power of combining agentic AI capabilities of Amazon Quick Suite with enterprise storage systems to create a more efficient and user-friendly file management experience. Although this post covers the use case of uploading a file to Google Drive, you can use a similar approach to upload files to other enterprise storage systems like Amazon Simple Storage Service (Amazon S3), Box, Dropbox, SharePoint, and more.
The following example demonstrates how manufacturers can use an Amazon Quick Suite to upload text files to shared drive in Google Drive.
The following diagram illustrates the solution architecture that uses AWS services and integrations to provide a seamless and user experience. It illustrates the key components and the flow of the solution.
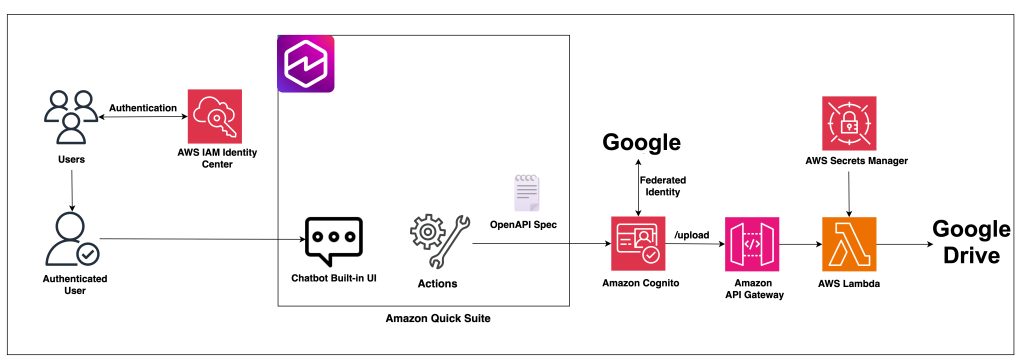
The architecture consists of the following key components:
- The UI for the chatbot is built using the Amazon Quick Suite chat agent.
- The user authentication is handled by AWS IAM Identity Center, and authorization is handled by Amazon Quick Suite and Amazon Cognito.
- Relevant actions are identified based on natural language queries from the users using Amazon Quick Suite action connectors. Amazon Quick Suite uses the configured third-party OpenAPI specifications to dynamically determine which API operations to perform to fulfill an end user request. Additionally, the API calls are authorized using an Amazon Cognito authorizer, which uses Google federated identity for authorization.
- The APIs are implemented using API Gateway and Lambda functions.
- The Lambda function has the logic to check if the authorized user has the necessary permissions to upload a file to the folder mentioned in the query, and calls the Google service by using the service account credentials stored in AWS Secrets Manager to upload the file to Google Drive.
In the following sections, we explore the technical approach for building an Amazon Quick Suite custom connectors to upload files to Google Drive. For step-by-step guidance, refer to the GitHub repository.
Prerequisites
Verify you have the following prerequisites:
- AWS account – Create an AWS account if you don’t already have one.
- IAM Identity Center enabled – For instructions, see Enable IAM Identity Center.
- Amazon Quick Suite Enterprise subscription – This subscription level is required to configure and setup actions. For pricing information, visit the Amazon Quick Suite pricing page.
Configure Google environment
In this section, you configure and set up the Google Workspace and Google Drive.
Set up the Google Workspace account
Before you can integrate the Google Drive functionality into the Amazon Quick Suite solution, you must first set up the necessary configurations within the Google Workspace environment. Complete the following steps:
- Enable Google Drive and Admin SDK APIs.
- Create a service account and a JSON private key to access the service account from Amazon Quick Suite. Save this key to complete the configuration in next steps.
- Add a domain-wide delegation. This involves associating the service account’s client ID with the following OAuth scopes to allow the service account to access organization data in Google Drive:
https://www.googleapis.com/auth/drive.readonlyhttps://www.googleapis.com/auth/drive.metadata.readonlyhttps://www.googleapis.com/auth/admin.directory.group.readonlyhttps://www.googleapis.com/auth/admin.directory.user.readonlyhttps://www.googleapis.com/auth/cloud-platform
Create users in Google Workspace
To demonstrate the access control functionality, create two test users in the Google Workspace admin console, called test user1 and test user2.
Configure shared drive in Google Drive
To configure the shared drive access permissions in Google Drive:
- Create a new shared drive in Google Drive and make note of the folder ID to use later when testing this solution.
- Set up access permissions:
- Grant
test user1the Content Manager role to allow full file management capabilities. - Leave
test user2without any access permissions to the shared drive.
- Grant
This setup makes it possible to validate that the solution correctly enforces access controls based on Google Drive permissions.
Configure AWS environment
In this section, we walk through the steps to configure AWS settings and resources.
Configure users and permissions on AWS
Create corresponding users in IAM Identity Center that match the test users created in Google Workspace:
- Create a user for
test user1. - Create a user for
test user2.
Alternatively, for enterprise deployments, manage users through your enterprise identity provider (IdP). Configure System for Cross-domain Identity Management (SCIM) for automated user provisioning and lifecycle management. For more information, see How to connect to an external identity provider.
- Complete the email verification and password reset process.
- Create a group within IAM Identity Center with the above two users added.
Create a secret for Google service account credentials
To store the Google service account credentials securely:
- Create a new secret in Secrets Manager:
- Store the JSON private key generated for the Google service account.
- Use appropriate secret naming conventions for quick identification.
- Configure access controls:
- Restrict access to the secret using AWS Identity and Access Management (IAM) policies and grant access only to the Lambda function that performs file uploads.
This secure credential management approach offers the following capabilities:
- Protects sensitive Google service account credentials
- Enables the Lambda function to authenticate with Google Drive APIs
- Supports secure file uploads on behalf of authorized users
- Follows AWS security best practices for managing application secrets
Create the Amazon Quick Suite account
To create and configure the Amazon Quick Suite account:
- Search for Amazon Quick Suite in AWS management console and sign up for a new Amazon Quick Suite account.
- Provide the account name and email address to which the notifications related to the account should be delivered.
- Select the authentication method as IAM Identity Center. This authentication method can be configured only using Enterprise edition of Quick Suite.
- Add the group created in IAM Identity Center with two test users as Admin Pro group.
- Keep all other setting as-is and create the account.
- Verify user access. Confirm both users can successfully log in to the account.
Configure Amazon Cognito for authentication and authorization
To configure Amazon Cognito, complete the following steps:
- In the Amazon Cognito console, create an Amazon Cognito user pool:
- Set up a new user pool to manage user identities.
- Configure basic user pool settings.
- Configure an application client:
- Create an application client in the user pool.
- Set Application type to Machine-to-machine application.
- Create an Amazon Cognito domain:
- Configure the domain with Hosted UI (classic) branding version.
- Make note of the Amazon Cognito domain name for subsequent steps.
- Configure Google OAuth credentials:
- In Google Workspace, create OAuth credentials, and provide the authorized redirect URI as
<cognito-domain-name>/oauth2/idpresponse.
- In Google Workspace, create OAuth credentials, and provide the authorized redirect URI as
- Set up Google as a federated IdP:
- Use the client ID and client secret from the Google OAuth credentials from the previous step.
- Configure authorized scopes as profile email openid (authorized scopes are separated with spaces).
- Map the Amazon Cognito user pool attributes for email, name, and user name to the corresponding Google attributes.
- Configure login page settings:
- Set Allowed callback URLs to
https://<your-region>.quicksight.aws.amazon.com/sn/oauthcallback. - Choose Google as the IdP.
- Set Allowed callback URLs to
- Configure OAuth 2.0:
- Set Grant type to Authorization code grant.
- Set the OpenID connect scopes as Email, OpenID, and Profile.
Ensure all URIs and callback URLs are correctly formatted and match your application’s configuration.
Configure the Lambda function
In this section, we walk through the steps to configure the Lambda function which contains the logic for validating user permissions, interacting with the Google Drive API and uploading the files to the designated folder.
- Deploy the Lambda function:
- Use the code provided in the lambda_function.py file.
- Include all necessary dependencies listed in the requirements.txt file.
- Configure environment variables:
COGNITO_USER_POOL_ID– The user pool ID from your Amazon Cognito configuration.REGION_NAME– Your AWS Region.SECRET_NAME– The Amazon Resource Name (ARN) of the secret for Google service account credentials stored in Secrets Manager.
- Set up Lambda execution IAM role permissions for the Lambda function to access Secrets Manager and Amazon Cognito. The steps to define the IAM policy can be found in the GitHub repository.
Configure API Gateway
Complete the following steps to configure an API resource:
- Create a REST API:
- Use the OpenAPI schema defined in the
api-gateway-spec.yamlfile, which can be found in the GitHub repository. - In the schema, provide your Region and Lambda function ARN.
- Use the OpenAPI schema defined in the
- Create a new stage for the API and configure stage settings appropriate for your environment.
- Configure the Amazon Cognito authorizer:
- Link to the previously created Amazon Cognito user pool.
- Set the authorization scopes:
openid,email,profile, andaws.cognito.signin.user.admin.
- Allow API Gateway to invoke the Lambda function from the function’s resource-based policy:
- On the Lambda console, modify the resource-based policy and grant invoke permission to the API Gateway source ARN for the POST method.
- Deploy the API:
- Deploy to your created stage.
- Make note of the API endpoint URL for use in the Amazon Quick Suite configuration.
Create the Amazon Quick Suite custom action connector
In this step, we create the custom action connector within Amazon Quick Suite:
- Locate the openapischema.json file in the GitHub repository and replace the following placeholder values:
<your-api-gateway-url-with-stage><your-cognito-domain-name><your-region><your-user-pool-id><your-cognito-app-client-id>
- Sign in to the Quick Suite account created earlier as
test user1. - Navigate to the integrations section in your Amazon Quick Suite account and create a new action using OpenAPI specification custom connector type.
- Upload the modified OpenAPI schema file named
openapischema.json.
- Upload the modified OpenAPI schema file named
- Create the integration with authentication method as User authentication and complete the other fields:
- Base URL – Use your API Gateway Endpoint. Make sure to include the stage name as well at the end.
- Client ID – Use your Cognito App client Client ID.
- Client secret – Use your Cognito App client Client Secret.
- Token URL –
<your-cognito-domain-name>/oauth2/token - Authorization URL –
<your-cognito-domain-name>/oauth2/authorize - Redirect URL –
https://<your-region>.quicksight.aws.amazon.com/sn/oauthcallback
- Share the integration – Share the integration created with the group in IAM Identity Center that has two test users added.
Users can now upload files to Google Drive through natural language interactions.
Create the Amazon Quick Suite chat agent to upload file to Google Drive:
There are two ways to interact with the chat agent
- Quick Suite has a default chat agent called My Assistant which can be used to add the action which is configured as part of the previous steps.
- Create a custom chat agent
- Choose Chat agents from the left navigation pane.
- Create a new chat agent by providing a Name and Agent identity.
- Under Actions, link the action connector created in the above step and launch the agent.
- Once the agent is launched successfully, share the agent with
test user2by searching the user’s email address and provide viewer permissions to the chat agent.
Test the solution
Now you’re ready to test the file upload capabilities with appropriate permissions.
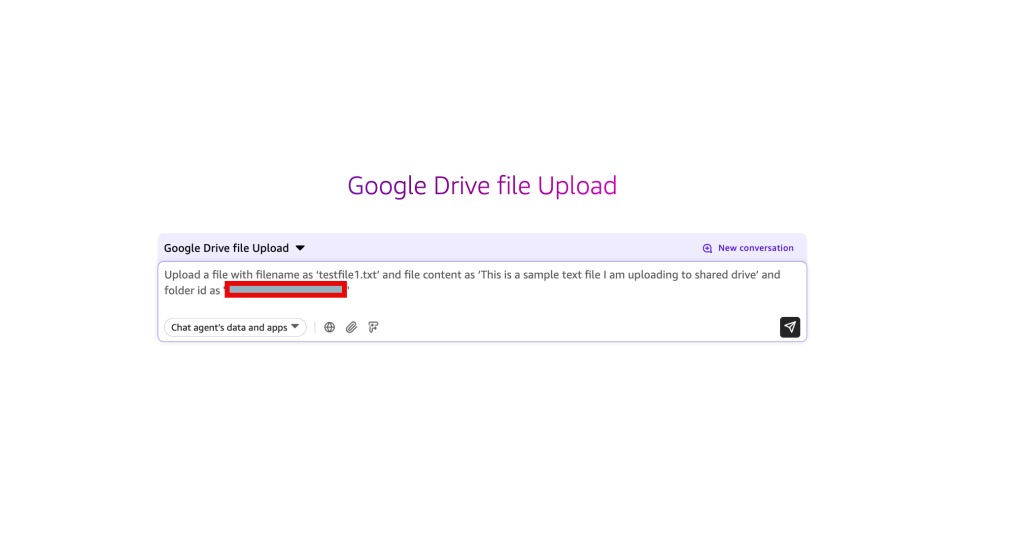
Scenario 1: Test as Content Manager or Contributor to the shared drive
- Log in to the Quick Suite account as
test user1. - Choose the chat agent from the left navigation pane. Select the agent created as part of the previous step.
- Enter the following prompt within the chat window: “Upload a file with filename as ‘testfile1.txt’ and file content as ‘This is a sample text file I am uploading to shared drive’ and folder id as <the shared drive folder id that you made note of while creating the shared drive in Google Drive>”.
When prompted to authorize, log in to the Google account.

After you are successfully authorized, verify the fields you entered and modify them if necessary.
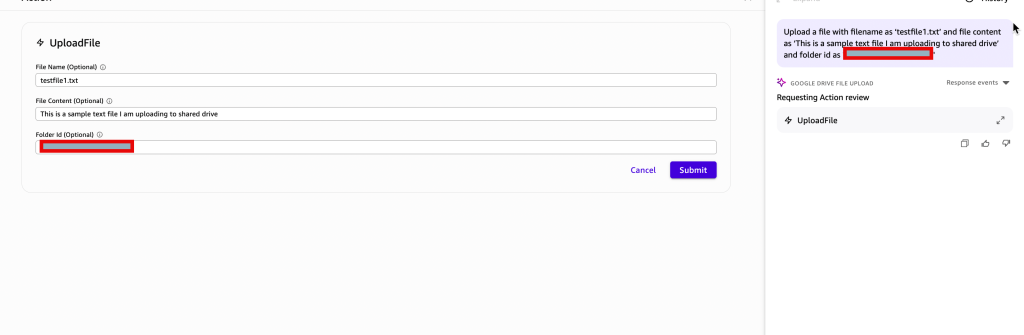
Once the action is completed, you’ll see a success message with the link to the file uploaded to Google Drive.
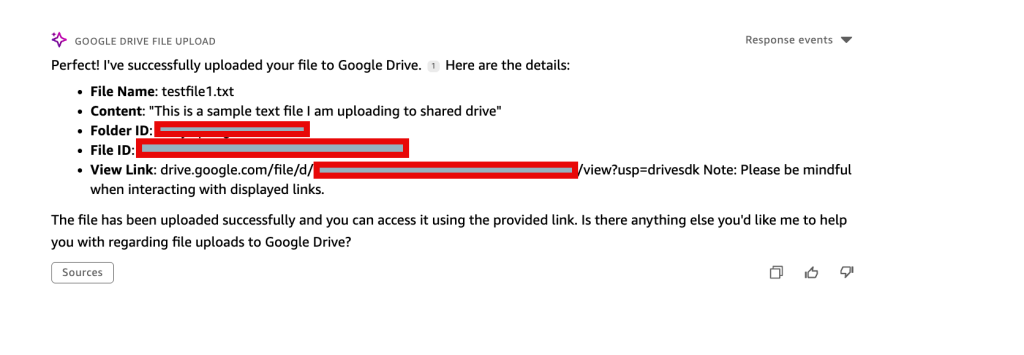
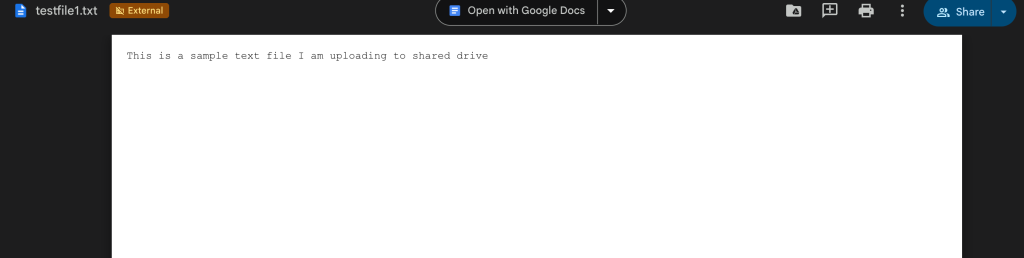
Copy and paste the link in a new browser tab to see the file uploaded.
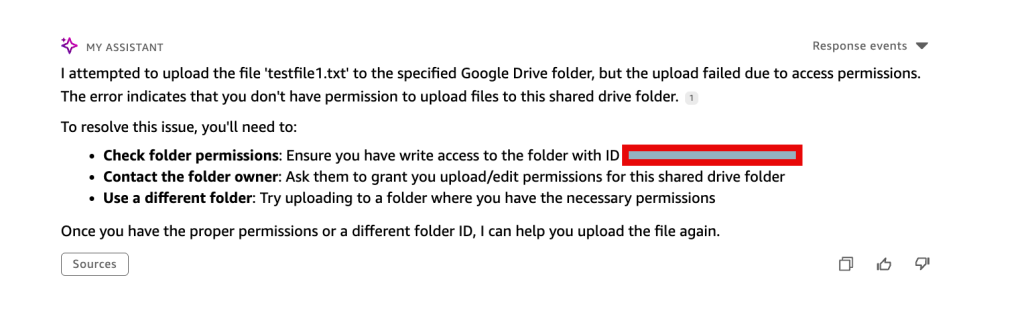
Scenario 2: Test with no permissions to the shared drive
Access the chat agent using Amazon Quick Suite account as test user2, then try to run the same prompt to upload the file to the shared drive. Because test user2 doesn’t have access to the shared drive, you’ll get an error message similar to that shown in the following screenshot.
Clean up
If you no longer require the resources deployed as part of this solution, and you want to avoid incurring ongoing costs associated with those resources, complete the following steps to clean up and delete the relevant components:
- Delete Amazon Quick Suite related resources, including your Amazon Quick Suite account.
- Delete the secrets created for this application from Secrets Manager.
- Delete the Lambda function.
- Delete the API deployed in API Gateway.
- Delete the user pool in Amazon Cognito and other configurations made.
Conclusion
This post demonstrated how organizations can use Amazon Quick Suite action connectors to build a secure and intuitive file upload solution that integrates with Google Drive. By using AWS services like API Gateway, AWS Lambda, Amazon Cognito, and Secrets Manager, along with the natural language capabilities of Amazon Quick Suite, businesses can transform file management tasks into simple, conversation-based interactions. With this secure file upload solution using Amazon Quick Suite, users can manage their Google Drive content through natural language interactions.
The key benefits of this approach include:
- Improved user experience – Users can upload files to Google Drive using natural language prompts, without needing specialized technical knowledge of the underlying APIs and systems.
- Enhanced security and compliance – The solution enforces access controls by allowing only users with necessary permissions to upload files to the shared drive with file access permissions managed through Google Drive and an Amazon Cognito user pool.
- Reduced operational complexity – The custom action connectors approach abstracts away the technical complexities of integrating with third-party cloud storage services, so organizations can focus on delivering valuable capabilities to their users.
For step-by-step guidance, refer to the GitHub repository. Try out the solution for yourself and share your feedback and questions in the comments.
About the authors
 Naimisha Pinna is a Solutions Architect at AWS, responsible for helping Enterprise customers on their journey in the cloud. She graduated with a Master’s degree in Computer Science from Old Dominion University. Her area of specialization is in AI and ML. She enjoys painting and gardening.
 Josh Demuth is a GenAI Solutions Architect with 20 years in the tech industry, with several years specializing in systems integration. He thrives on creating solutions that make disparate systems work together and discovering innovative approaches to business problems. The rapid evolution of AI and automation has him excited about the transformative solutions on the horizon.