Training state-of-the-art large language models (LLMs) demands massive, distributed compute infrastructure. Meta’s Llama 3, for instance, ran on 16,000 NVIDIA H100 GPUs for over 30.84 million GPU hours. Amazon Elastic Kubernetes Service (Amazon EKS) is a managed service that simplifies the deployment, management, and scaling of Kubernetes clusters that can scale up to the ranges needed to train LLMs. To facilitate the configuration of such large, distributed workloads, AWS Deep Learning Containers (DLCs) provide pre-built, performance-optimized images for popular frameworks like PyTorch, so teams can launch jobs faster and with fewer compatibility issues. However, even with Amazon EKS and DLCs, configuring clusters for large training workloads is not a trivial task.
A source of complexity for the configuration of the training cluster is the configuration of the GPUs in the GPU-powered instances used in distributed training. GPU-powered Amazon Elastic Compute Cloud (Amazon EC2) instances come in two families: the G family (for example, G6 with NVIDIA L4 Tensor Core GPUs) for cost-efficient inference and lighter training, and the P family (for example, P6 with NVIDIA GB200 NVL72) for massive, distributed jobs. A single P5 has 8 H100 GPUs with 640 GB HBM3 and delivers 3,200 Gbps EFA networking, ideal for multi-billion-parameter model training. Although G instances are more affordable, they lack the high-bandwidth, low-latency fabric, and memory throughput needed for extreme scale. P instances, though fast, require precise configuration of networking, storage, and GPU topologies, making them powerful but operationally complex and a potential source of misconfigurations or errors for the distributed job.
Misconfiguration issues in distributed training with Amazon EKS can be prevented following a systematic approach to launch required components and verify their proper configuration. This post walks through the steps to set up and verify an EKS cluster for training large models using DLCs.
Solution overview
The solution consists of the following high-level steps:
- Build a Docker image with the required dependencies using a PyTorch Framework DLC.
- Launch the required infrastructure in a stable, GPU-ready cluster with Amazon EKS.
- Install task-specific plugins required for GPU device plugins, Elastic Fabric Adapter (EFA) support, distributed training frameworks, and persistent file storage.
- Run health checks to verify node readiness and the correct configuration of NVIDIA and EFA plugins.
- Launch a small training job to verify the whole system.
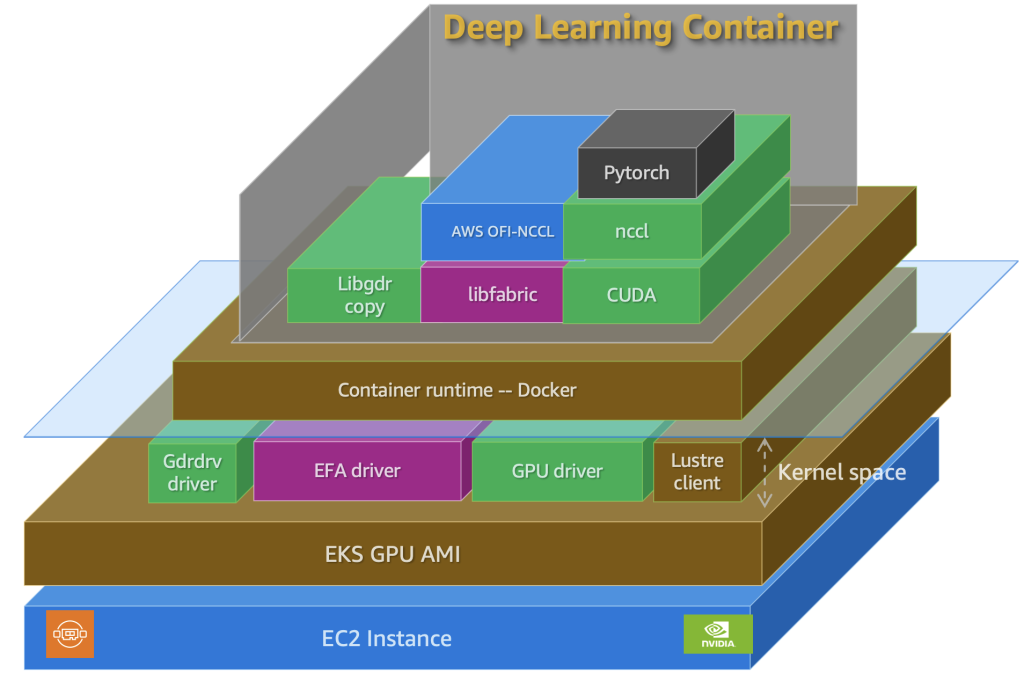
We walk through these steps using a fleet of two p4d.24xlarge instances that we are consuming from a capacity reservation. The scripts used in this post are available in GitHub. Similar scripts for other GPU-powered instances are available in the following GitHub repository. The overall component setup, including worker nodes with persistent storage, plugins, and drivers, is shown in the following diagram.
Prerequisites
To deploy this solution, you need to have these prerequisites:
- An AWS account with billing enabled
- Sufficient service quotas for on-demand G instances, or access to a capacity reservation
- Hugging Face token with access to Meta Llama 2 7B
Build Docker image from AWS DLC
DLCs are pre-built, performance-optimized Docker images that make it straightforward to run popular frameworks like PyTorch and TensorFlow on AWS. Each DLC ships with a fully integrated stack that includes compatible versions of CUDA, cuDNN, and NCCL, plus optional EFA support for high-throughput, low-latency distributed training. These containers are validated across Amazon EC2, Amazon Elastic Container Service (Amazon ECS), and Amazon EKS, providing consistent performance on G- and P-family GPU instances. This uniform environment is critical for distributed workloads, where even minor version mismatches can trigger throughput degradation, stalled all-reduce operations, or CUDA/NCCL errors. Although it’s possible to build training containers from scratch, doing so at production scale is tedious: GPU drivers, CUDA, NCCL, and networking libraries must be aligned with strict version and hardware requirements. DLCs simplify this by providing secure, regularly updated images that are already optimized for AWS infrastructure.
Most distributed training jobs need additional libraries, launch utilities, or orchestration scripts that the base DLCs don’t include. As a result, teams typically use DLCs as a foundation and extend them with the dependencies required for their workloads. This approach preserves the reliability of AWS optimized images while providing the flexibility to customize for large-scale training.
In this post, we show the process of building a custom Docker container by adding custom Python libraries to the PyTorch 2.7.1 Training DLC to launch a training job with Meta Llama 2 7B. For more details, refer to AWS Deep Learning Containers for PyTorch 2.7 Training on EC2, ECS and EKS. To prevent mismatches with the NVIDIA drivers and CUDA versions, we recommend using an EC2 instance powered by a Deep Learning AMI (DLAMI) to build the image. The DLAMI is used only for building a container image used by the training job referenced in this post. It’s different from an Amazon EKS optimized AMI, which is used to run worker nodes in an EKS cluster to run that training job.
Complete the following steps to build a Docker image:
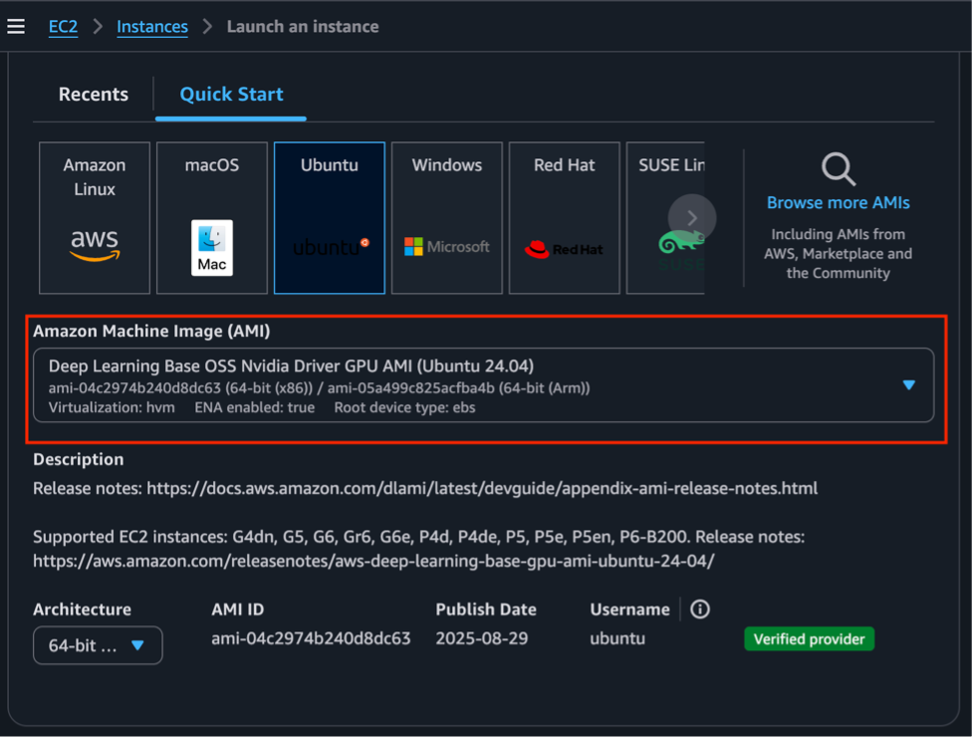
- Launch an EC2 instance using the “Deep Learning Base OSS Nvidia Driver GPU AMI (Ubuntu 24.04)” for 64-bit (x86) architecture. Use at least a c5.4xlarge instance or larger, and enable HTTP/HTTPS traffic from the internet.
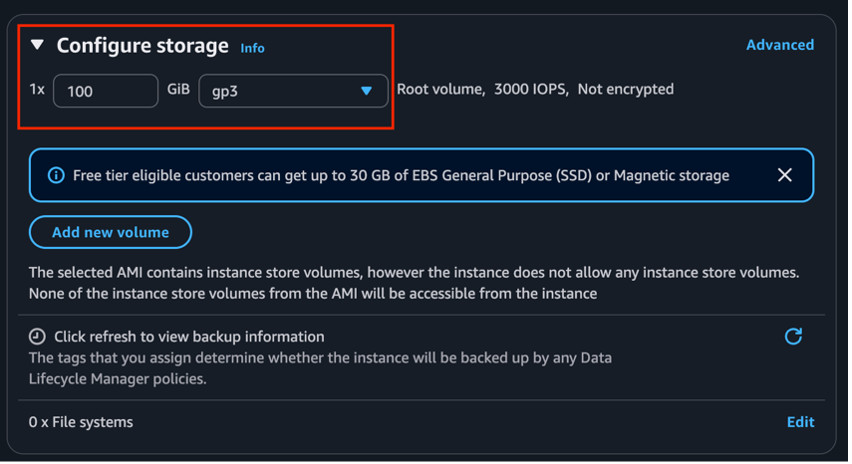
- Allocate at least 100 GiB for storage.
- Connect to the EC2 instance using an SSH client and your private key for authentication.
- Clone the GitHub repository to access the scripts for this post:
- Install the AWS CLI, kubectl, and eksctl to manage the training clusters from the command line of the EC2 instance:
- Run the following script to authenticate into the DLC registry, build the custom image with the dependencies specified in the Dockerfile, and push the custom image to a private repository:
Launch EKS cluster
In this step, we use a YAML file to launch an EKS cluster that contains the required infrastructure for the distributed training job. We launch two managed node groups in an existing virtual private cloud (VPC) and subnets:
- A system node group (c5.2xlarge) for running cluster system pods and auto scaling components
- A GPU node group (p4d.24xlarge) with EFA enabled networking and RAID0 local storage, designed for distributed training
The script also installs several Amazon EKS add-ons (for example, an EBS CSI driver, Amazon CloudWatch observability, or a node monitoring agent) for storage provisioning and cluster observability.
Other sample configurations for training clusters are available in the GitHub repo:
- eks-g4dn-vpc.yaml – G4dn with EFA
- eks-p4de-odcr.yaml – P4de with capacity reservation
- eks-p5-odcr.yaml – P5 with capacity reservation
You can modify the chosen YAML file with your AWS Region, Kubernetes version, VPC and subnets, and optional capacity reservation details. Managed node groups are recommended because they handle node lifecycle, software, and cluster integration automatically, reducing operational overhead compared to self-managed nodes.
After the YAML file has been updated, launch your cluster:
Provisioning takes 15–30 minutes. You can verify the status of your nodes with the following command:
With a successful deployment, you should see all nodes in Ready status.
Use the following command to see all pods created by installed add-ons in Running status:
Install training-specific plugins
After you set up a basic EKS cluster, you must install additional plugins to enable critical functionalities for distributed training workloads. These plugins make sure GPUs, high-speed networking, distributed training frameworks, and persistent storage are available and correctly integrated into the cluster:
- NVIDIA GPU plugin – The NVIDIA device plugin exposes GPU resources to Kubernetes, enabling pods to request and use GPUs
- EFA plugin – The EFA device plugin provides high-performance networking for EFA enabled instances (for example P4 and P5), which is essential for multi-node training
- Distributed training plugins – These plugins include services like etcd—for rendezvous in PyTorch—and the Kubeflow Training Operator (with the MPI Operator) to enable large-scale job orchestration
- Persistent file storage – The FSx CSI driver and EBS CSI driver enable scalable, high-throughput storage for datasets, model checkpoints, monitoring, and logs in Amazon FSx for Lustre and Amazon Elastic Block Store (Amazon EBS), respectively
By enabling these plugins, the cluster becomes production-ready for large-scale training workloads.
Install the NVIDIA device plugin
Because we’re using an Amazon EKS optimized AMI with GPU support, the NVIDIA device plugin is already included. Verify that the plugin pods are running with the following command:
The expected output is as follows:
If the plugin is missing, install it manually with the following command:
Verify the availability of GPUs in your nodes with the following command:
The expected output for nodes with 8 GPUs is as follows:
Install the EFA plugin
If you are using EFA enabled instances (such as P4d, P4de, or P5), verify that EFA resources are advertised:
The expected values will depend on your instance type:
- P4d or p4de: 4
- P5: 32
If EFA is not visible, use the following command to install the plugin:
Install distributed training plugins: etcd and Kubeflow Training Operator
In distributed PyTorch training workloads on Kubernetes, etcd serves as an elegant coordination mechanism that enables seamless worker orchestration. This powerful backend service built for Kubernetes acts as a central meeting point where training workers can perform three critical functions: register their presence in the cluster, discover their peer workers, and achieve synchronized startup across the distributed training job. This coordination pattern is particularly valuable when running large-scale machine learning (ML) workloads on Amazon EKS to enable efficient distributed training.
Create an etcd store with the following command:
Verify its deployment:
The output should look like the following code:
The Kubeflow Training Operator simplifies distributed PyTorch training on Amazon EKS by providing custom resources (such as PyTorchJob) that automate the complex orchestration of multi-node training deployments, including worker pod lifecycle management and fault handling. By using the built-in MPI Operator, it enables efficient inter-node communication patterns critical for distributed deep learning workloads, handling the intricacies of MPI process placement, rank assignment, and network configuration that would otherwise require significant manual setup and expertise.
Deploy Kubeflow Training Operator:
Kubeflow Training Operator (v1) is a legacy project to Kubeflow Trainer (v2), which is currently in alpha status, and APIs may change.
Install storage plugins: FSx for Luster and Amazon EBS
For latency-sensitive and high-bandwidth throughput dynamic workloads, such as distributed training and model serving across multiple GPU compute instances, we recommend FSx for Lustre. It provides a fully managed, high-performance parallel file system that is designed for compute-intensive workloads like high-performance computing (HPC) and ML.
We installed the FSx for Lustre file system CSI driver using the Amazon EKS add-on while creating the cluster to mount FSx for Lustre file systems on Amazon EKS as a persistent volume (PV). In this step, you deploy an FSx for Lustre file system as a standalone high-performance cache or as an Amazon Simple Storage Service (Amazon S3) linked file system to act as a high-performance cache for Amazon S3 data, providing fast I/O and high throughput for data access across your GPU compute instances.
Create the FSx for Lustre file system with the following command:
Create a PVC object to allow Kubernetes pods to claim storage on the FSx for Lustre file system:
In FSx for Lustre, throughput scales with storage type and provisioned capacity. Optimize your deployment based on your dataset size and checkpointing needs.
The EBS CSI driver gives Amazon EKS the ability to dynamically create and attach block volumes (using Amazon EBS) to pods. When creating node groups, EBS root volumes can be preconfigured (size, type: gp2/gp3/io1/io2). We have already installed the EBS CSI driver through the EKS cluster setup. Verify that the instance role includes the policy arn:aws:iam::aws:policy/service-role/AmazonEBSCSIDriverPolicy, because without it, EBS PVC provisioning will fail.
In summary, by layering these plugins on top of a baseline EKS cluster, you can unlock the following:
- GPUs for compute
- High-performance networking
- Orchestration for distributed training
- Persistent storage
Together, these plugins create an environment capable of supporting large-scale, fault-tolerant, high-performance deep learning workloads on Amazon EKS.
Verify plugins for distributed training
When you first launch a distributed GPU training cluster on Amazon EKS (with AWS DLCs), it’s critical to validate that the environment is healthy before starting large-scale jobs. This prevents wasted time and cost due to misconfigurations or hardware issues. The checks discussed in this section cover the most important areas.
GPU driver and NVIDIA-SMI validation
Each GPU node must have a valid driver installation that matches the CUDA version in your AWS DLC. You can verify this either by running a script inside a GPU-enabled pod or by connecting with AWS Systems Manager.
Regardless of the option you chose, confirm the following as part of your validation:
- The driver version matches the CUDA version in your DLC
- The GPU model, temperature, and utilization look correct
- No errors are reported
Option 1: Run inside a GPU-enabled debug pod
The NVIDIA System Management Interface (nvidia-smi) is a command line utility intended to aid in the management and monitoring of NVIDIA GPU devices. This utility makes it possible for administrators to query GPU device state.
Apply an nvidia-smi job manifest using the following code:
Option 2: Connect directly using Systems Manager
Find the instance ID of your node:
Start a Systems Manager session:
Run the nvidia-smi check to query the state of your GPUs:
NCCL and multi-node communication
Distributed training depends on fast GPU-to-GPU communication, often using the NVIDIA Collective Communications Library (NCCL).
Deploy NCCL tests with the following script:
Verify that the NCCL worker pods are up and running:
The results should look like the following code:
Validate the following:
- All-reduce and communication operations complete without errors
- Bandwidth and latency values are within expected ranges
- If using EFA, confirm that the NCCL is using AWS_OFI_NCCL as the transport layer (optimal for HPC networking)
Validate training environment with sample workload
Finally, validate that your framework (PyTorch), GPUs, and networking all integrate properly by running a small training workload. In this case, we demonstrate this by running supervised fine-tuning on a Meta Llama 2 model.
- Get a Hugging Face token. Llama 2 7B is a gated model, so you must request access to the model and then pass your Hugging Face token to the FSDP script. To register and obtain a token here, see User access tokens. Then insert the token into your conf file.
- Run the validation script to load the environment variables and generate a job YAML manifest from the template:
- Start a PyTorch distributed job:
The expected output is as follows:
- Check that the worker pods have been created:
The output should show both FSDP worker pods as Running:
- Inspect the job:
You should see pod events like those in the following screenshot.

- After the pod is created, review the logs for errors or failures:
When the job is complete, the pods should move to a Completed state:
If the job starts properly, you can stop the job with the following commands:
Both the worker pods and the etcd pod must be deleted and recreated before launching a new job, otherwise you might encounter RendezvousClosedError.
These initial health checks help validate the following:
- The cluster and nodes are ready
- GPUs are installed, visible, and healthy
- Multi-node communication is optimized
- The AWS DLC environment can run ML workloads
After these checks pass, you can scale up to large-scale distributed training jobs.
Clean up
Delete the cluster using the following command when it’s no longer needed to prevent incurring cost:
Conclusion
Distributed training requires an infrastructure foundation that delivers both computing power and predictability. When you integrate the Amazon EKS optimized AMI together with AWS DLCs, the result is a GPU-enabled cluster offering a consistent, validated runtime environment that spans all nodes. The implementation of high-bandwidth, low-latency networking capabilities enhanced with EFA helps distributed workloads execute at maximum efficiency. The addition of GPU plugins, coupled with storage integration and distributed training frameworks, creates a streamlined approach to scaling and orchestration. The final step of executing targeted initial health checks, which include NCCL connectivity testing, confirms the cluster is fully prepared for long-duration training operations. After these components are properly configured, teams can redirect their energy from infrastructure maintenance to achieving breakthrough advances in model performance.
For scripts for running FSDP distributed training on Amazon EKS, refer to the following GitHub repo. For distributed training reference architectures, and tests, refer to the following GitHub repo. For a list of available DLC images, refer to the following GitHub repo. For an alternative implementation for running ML training and inference on Amazon EKS using a JARK stack, refer to Deploy Generative AI Models on Amazon EKS.
About the authors
 Meryem Ozcelik is a GenAI/ML Specialist Solution Architect at Amazon Web Services. Her work focuses on designing and implementing generative AI and machine learning solutions, specializing in Amazon Bedrock, SageMaker, and AI/ML workload optimization on AWS. She helps accelerating AI adoption through architectural guidance, best practices, and scalable ML infrastructure design. Meryem holds a Master’s Degree in Computer Science from Georgia Institute of Technology.
 Pratik Yeole is a solutions architect specializing in container services at AWS. He helps customers adopt modern cloud-native architectures and best practices. He is a tenured Amazonian with expertise in containers and AI/ML. For leisure, he plays cricket, chess and enjoys game nights/hikes/restaurants with family and friends.
 Felipe Lopez is a Senior AI/ML Specialist Solutions Architect at AWS. Prior to joining AWS, Felipe worked with GE Digital and SLB, where he focused on modeling and optimization products for industrial applications.
 Jinyan Li is a Software Development Engineer at Amazon Web Services. Her work focuses on building and improving containerized environments for machine learning workloads on AWS. She holds a Master’s degree in Computer Science from Northeastern University.
 Sirut “G” Buasai is a Software Development Engineer at Amazon Web Services, working within the SageMaker AI organization. He specializes in optimizing deep learning containers and developing cloud-native solutions for machine learning workloads. His expertise includes container optimization, Kubernetes development, and ML model performance benchmarking.