This post is the second part of the DeepSeek series focusing on model customization with Amazon SageMaker HyperPod recipes (or recipes for brevity). In Part 1, we demonstrated the performance and ease of fine-tuning DeepSeek-R1 distilled models using these recipes. In this post, we use the recipes to fine-tune the original DeepSeek-R1 671b parameter model. We demonstrate this through the step-by-step implementation of these recipes using both SageMaker training jobs and SageMaker HyperPod.
Business use case
After its public release, DeepSeek-R1 model, developed by DeepSeek AI, showed impressive results across multiple evaluation benchmarks. The model follows the Mixture of Experts (MoE) architecture and has 671 billion parameters. Traditionally, large models are well adapted for a wide spectrum of generalized tasks by the virtue of being trained on the huge amount of data. The DeepSeek-R1 model was trained on 14.8 trillion tokens. The original R1 model demonstrates strong few-shot or zero-shot learning capabilities, allowing it to generalize to new tasks and scenarios that weren’t part of its original training.
However, many customers prefer to either fine-tune or run continuous pre-training of these models to adapt it to their specific business applications or to optimize it for specific tasks. A financial organization might want to customize the model with their custom data to assist with their data processing tasks. Or a hospital network can fine-tune it with their patient records to act as a medical assistant for their doctors. Fine-tuning can also extend the model’s generalization ability. Customers can fine-tune it with a corpus of text in specific languages that aren’t fully represented in the original training data. For example, a model fine-tuned with an additional trillion tokens of Hindi language will be able to expand the same generalization capabilities to Hindi.
The decision on which model to fine-tune depends on the end application as well as the available dataset. Based on the volume of proprietary data, customers can decide to fine-tune the larger DeepSeek-R1 model instead of doing it for one of the distilled versions. In addition, the R1 models have their own set of guardrails. Customers might want to fine-tune to update those guardrails or expand on them.
Fine-tuning larger models like DeepSeek-R1 requires careful optimization to balance cost, deployment requirements, and performance effectiveness. To achieve optimal results, organizations must meticulously select an appropriate environment, determine the best hyperparameters, and implement efficient model sharding strategies.
Solution architecture
SageMaker HyperPod recipes effectively address these requirements by providing a carefully curated mix of distributed training techniques, optimizations, and configurations for state-of-the-art (SOTA) open source models. These recipes have undergone extensive benchmarking, testing, and validation to provide seamless integration with the SageMaker training and fine-tuning processes.
In this post, we explore solutions that demonstrate how to fine-tune the DeepSeek-R1 model using these recipes on either SageMaker HyperPod or SageMaker training jobs. Your choice between these services will depend on your specific requirements and preferences. If you require granular control over training infrastructure and extensive customization options, SageMaker HyperPod is the ideal choice. SageMaker training jobs, on the other hand, is tailored for organizations that want a fully managed experience for their training workflows. To learn more details about these service features, refer to Generative AI foundation model training on Amazon SageMaker.
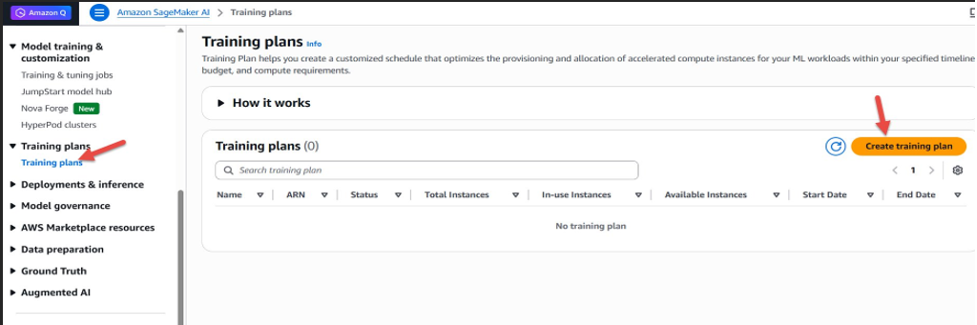
The following diagram illustrates the solution architecture for training using SageMaker HyperPod. With HyperPod, users can begin the process by connecting to the login/head node of the Slurm cluster. Each step is run as a Slurm job and uses Amazon FSx for Lustre for storing model checkpoints. For DeepSeek-R1, the process consists of the following steps:
- Download the DeepSeek-R1 model and convert weights from FP8 to BF16 format
- Load the model into memory and perform fine-tuning using Quantized Low-Rank Adaptation (QLoRA)
- Merge QLoRA adapters with the base model
- Convert and load the model for batch evaluation

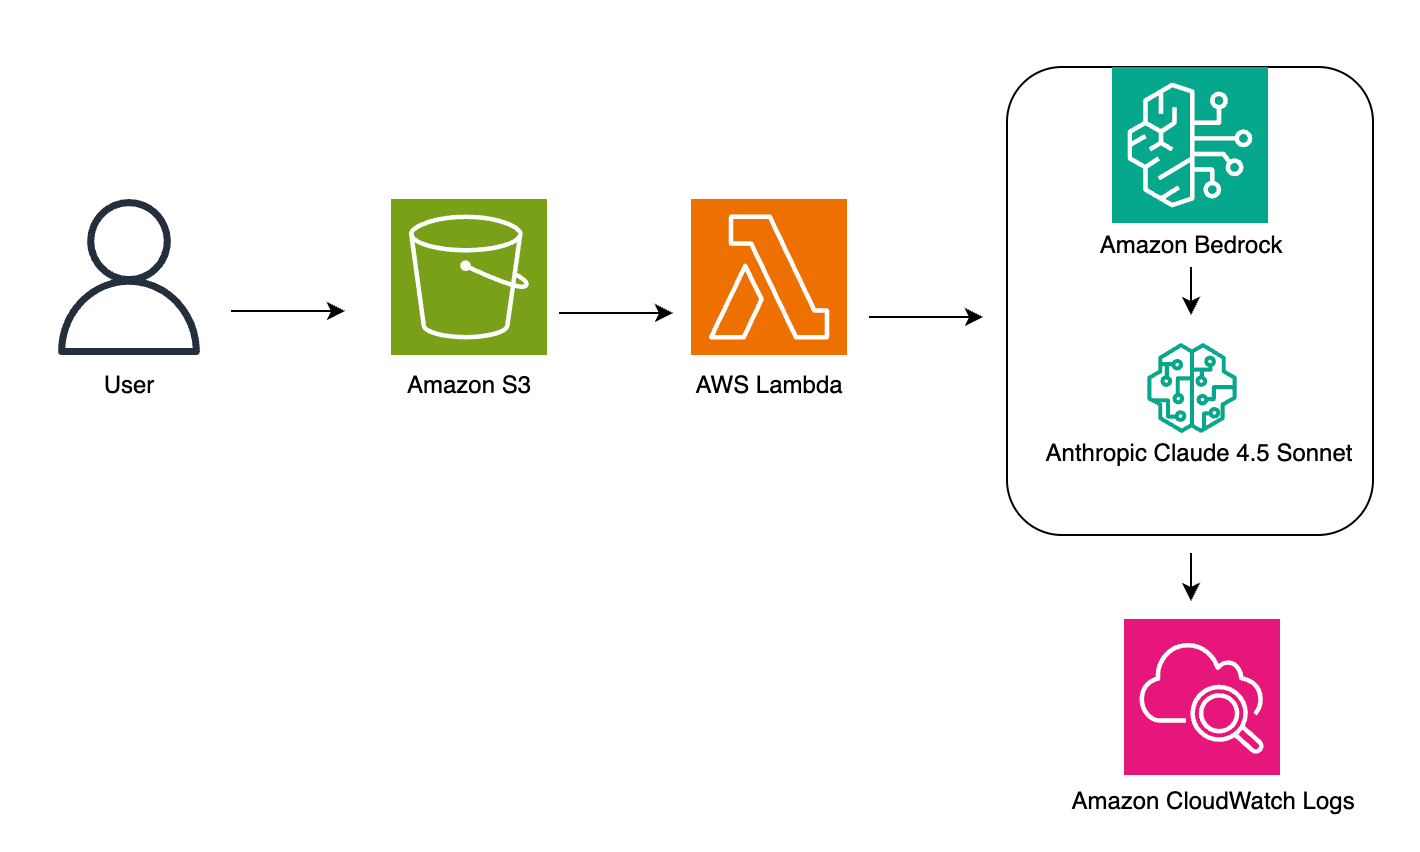
The following diagram illustrates the solution architecture for SageMaker training jobs. You can execute each step in the training pipeline by initiating the process through the SageMaker control plane using APIs, AWS Command Line Interface (AWS CLI), or the SageMaker ModelTrainer SDK. In response, SageMaker launches training jobs with the requested number and type of compute instances to run specific tasks. For DeepSeek-R1, the process consists of three main steps:
- Download and convert R1 to BF16 datatype format
- Load the model into memory and perform fine-tuning
- Consolidate and load the checkpoints into memory, then run inference and metrics to evaluate performance improvements

Prerequisites
Complete the following prerequisites before running the DeepSeek-R1 671B model fine-tuning notebook:
- Make the following quota increase requests for SageMaker. You need to request a minimum of two
ml.p5.48xlargeinstances (with 8 x NVIDIA H100 GPUs) ranging to a maximum of fourml.p5.48xlargeinstances (depending on time-to-train and cost-to-train trade-offs for your use case). On the Service Quotas console, request the following SageMaker quotas. It can take up to 24 hours for the quota increase to be approved:- P5 instances (
ml.p5.48xlarge) for training job usage: 2–4 - P5 instances (
ml.p5.48xlarge) for HyperPod clusters (ml.p5.48xlarge for cluster usage): 2–4
- P5 instances (
- If you choose to use HyperPod clusters to run your training, set up a HyperPod Slurm cluster, referring to Amazon SageMaker HyperPod Developer Guide. Alternatively, you can also use the AWS CloudFormation template provided in the Own Account workshop and follow the instructions to set up a cluster and a development environment to access and submit jobs to the cluster.
- (Optional) If you choose to use SageMaker training jobs, you can create an Amazon SageMaker Studio domain (refer to Use quick setup for Amazon SageMaker AI) to access Jupyter notebooks with the preceding role (You can use JupyterLab in your local setup too).
- Create an AWS Identity and Access Management (IAM) role with managed policies
AmazonSageMakerFullAccess,AmazonFSxFullAccess, andAmazonS3FullAccessto give the necessary access to SageMaker to run the examples.
- Create an AWS Identity and Access Management (IAM) role with managed policies
- Clone the GitHub repository with the assets for this deployment. This repository consists of a notebook that references training assets:
Solution walkthrough
To perform the solution, follow the steps in the next sections.
Technical considerations
The default weights provided by the DeepSeek team on their official R1 repository are of type FP8. However, we chose to disable FP8 in our recipes because we empirically found that training with BF16 enhances generalization across diverse datasets with minimal changes to the recipe hyperparameters. Therefore, to achieve stable fine-tuning for a model of 671b parameter size, we recommend first converting the model from FP8 to BF16 using the fp8_cast_bf16.py command-line script provided by DeepSeek. Executing this script will copy over the converted BF16 weights in Safetensor format to the specified output directory. Remember to copy over the model’s config.yaml to the output directory so the weights are loaded accurately. These steps are encapsulated in a prologue script and are documented step-by-step under the Fine-tuning section.
Customers can use a sequence length of 8K for training, as tested on a p5.48xlarge instance, each equipped with eight NVIDIA H100 GPUs. You can also choose a smaller sequence length if needed. Training with a sequence length greater than 8K might lead to out-of-memory issues with GPUs. Also, converting model weights from FP8 to BF16 requires a p5.48xlarge instance, which is also recommended for training due to the model’s high host memory requirements during initialization.
Customers must upgrade their transformers version to transformers==4.48.2 to run the training.
Fine-tuning
Run the finetune_deepseek_r1_671_qlora.ipynb notebook to fine-tune the DeepSeek-R1 model using QLoRA on SageMaker.
Prepare the dataset
This section covers loading the FreedomIntelligence/medical-o1-reasoning-SFT dataset, tokenizing and chunking the dataset, and configuring the data channels for SageMaker training on Amazon Simple Storage Service (Amazon S3). Complete the following steps:
- Format the dataset by applying the prompt format for DeepSeek-R1:
- Load the FreedomIntelligence/medical-o1-reasoning-SFT dataset and split it into training and validation datasets:
- Load the DeepSeek-R1 tokenizer from the Hugging Face Transformers library and generate tokens for the train and validation datasets. We use the original sequence length of 8K:
- Prepare the training and validation datasets for SageMaker training by saving them as
arrowfiles, required by SageMaker HyperPod recipes, and constructing the S3 paths where these files will be uploaded. This dataset will be used in both SageMaker training jobs and SageMaker HyperPod examples:
The next section describes how to run a fine-tuning example with SageMaker training jobs.
Option A: Fine-tune using SageMaker training jobs
Follow these high-level steps:
- Download DeepSeek-R1 to the FSx for Lustre mounted directory
- Convert DeepSeek-R1 from FP8 to BF16
- Fine-tune the DeepSeek-R1 model
- Merge the trained adapter with the base model
Define a utility function to create the ModelTrainer class for every step of the SageMaker training jobs pipeline:
Download DeepSeek-R1 to the FSx for Lustre mounted directory
Follow these steps:
- Select the instance type, Amazon FSx data channel, network configuration for the training job, and source code, then define the ModelTrainer class to run the training job on the
ml.c5.18xlargeinstance to download DeepSeek-R1 from the Hugging Face DeepSeek-R1 hub:
- Initiate the training calling train function of the ModelTrainer class:
Convert DeepSeek R1 from FP8 to BF16
Use ModelTrainer to convert the DeepSeek-R1 downloaded model weights from FP8 to BF16 format for optimal PEFT training. We use script convert.sh to run the execution using the ml.c5.18xlarge instance.
Use SageMaker training warm pool configuration to retain and reuse provisioned infrastructure after the completion of a model download training job in the previous step:
Fine-tune the DeepSeek-R1 model
The next phase involves fine-tuning the DeepSeek-R1 model using two ml.p5.48xlarge instances, using distributed training. You implement this through the SageMaker recipe hf_deepseek_r1_671b_seq8k_gpu_qlora, which incorporates the QLoRA methodology. QLoRA makes the large language model (LLM) trainable on limited compute by quantizing the base model to 4-bit precision while using small, trainable low-rank adapters for fine-tuning, dramatically reducing memory requirements without sacrificing model quality:
Initiate the training job to fine-tune the model. SageMaker training jobs will provision two P5 instances, orchestrate the SageMaker model parallel container smdistributed-modelparallel:2.4.1-gpu-py311-cu121, and execute the recipe to fine-tune DeepSeek-R1 with the QLoRA strategy on an ephemeral cluster:
Merge the trained adapter with the base model
Merge the trained adapters with the base model so it can be used for inference:
The next section shows how you can run similar steps on HyperPod to run your generative AI workloads.
Option B: Fine-tune using SageMaker HyperPod with Slurm
To fine-tune the model using HyperPod, make sure that your cluster is up and ready by following the prerequisites mentioned earlier. To access the login/head node of the HyperPod Slurm cluster from your development environment, follow the login instructions at SSH into Cluster in the workshop.
Alternatively, you can also use AWS Systems Manager and run a command such as the following to start the session. You can find the cluster ID, instance group name, and instance ID on the Amazon SageMaker console.
- When you’re in the cluster’s login/head node, run the following commands to set up the environment. Run
sudo su - ubuntuto run the remaining commands as the root user, unless you have a specific user ID to access the cluster and your POSIX user is created through a lifecycle script on the cluster. Refer to the multi-user setup for more details.
- Create a squash file using Enroot to run the job on the cluster. Enroot runtime offers GPU acceleration, rootless container support, and seamless integration with HPC environments, making it ideal for running workflows securely.
- After you’ve created the squash file, update the
recipes_collection/config.yamlfile with the absolute path to the squash file (created in the preceding step), and update theinstance_typeif needed. The final config file should have the following parameters:
Also update the file recipes_collection/cluster/slurm.yaml to add container_mounts pointing to the FSx for Lustre file system used in your cluster.
Follow these high-level steps to set up, fine-tune, and evaluate the model using HyperPod recipes:
- Download the model and convert weights to BF16
- Fine-tune the model using QLoRA
- Merge the trained model adapter
- Evaluate the fine-tuned model
Download the model and convert weights to BF16
Download the DeepSeek-R1 model from the HuggingFace hub and convert the model weights from FP8 to BF16. You need to convert this to use QLoRA for fine-tuning. Copy and execute the following bash script:
Fine-tune the model using QLoRA
Download the prepared dataset that you uploaded to Amazon S3 into your FSx for Lustre volume attached to the cluster.
- Enter the following commands to download the files from Amazon S3:
- Update the launcher script to fine-tune the DeepSeek-R1 671B model. The launcher scripts serve as convenient wrappers for executing the training script, main.py file, simplifying the process of fine-tuning and parameter adjustment. For fine-tuning the DeepSeek R1 671B model, you can find the specific script at:
Before running the script, you need to modify the location of the training and validation files, update the HuggingFace model ID, and optionally the access token for private models and datasets. The script should look like the following (update recipes.trainer.num_nodes if you’re using a multi-node cluster):
You can view the recipe for this fine-tuning task under recipes_collection/recipes/fine-tuning/deepseek/hf_deepseek_r1_671b_seq8k_gpu_qlora.yaml and override additional parameters as needed.
- Submit the job by running the launcher script:
Monitor the job using Slurm commands such as squeue and scontrol show to view the status of the job and the corresponding logs. The logs can be found in the results folder in the launch directory. When the job is complete, the model adapters are stored in the EXP_DIR that you defined in the launch. The structure of the directory should look like this:
You can see the trained adapter weights are stored as part of the checkpointing under ./checkpoints/peft_sharded/step_N. We will later use this to merge with the base model.
Merge the trained model adapter
Follow these steps:
- Run a job using the
smdistributed-modelparallelenroot image to merge the adapter with the base model.
- Download the
merge_peft_checkpoint.pycode from sagemaker-hyperpod-training-adapter-for-nemo repository and store it in Amazon FSx. Modify the export variables in the following scripts accordingly to reflect the paths forSOURCE_DIR,ADAPTER_PATH,BASE_MODEL_BF16andMERGE_MODEL_PATH.
Evaluate the fine-tuned model
Use the basic testing scripts provided by DeekSeek to deploy the merged model.
- Start by cloning their repo:
- You need to convert the merged model to a specific format for running inference. In this case, you need 4*P5 instances to deploy the model because the merged model is in BF16. Enter the following command to convert the model:
- When the conversion is complete, use the following sbatch script to run the batch inference, making the following adjustments:
- Update the
ckpt-pathto the converted model path from the previous step. - Create a new
prompts.txtfile with each line containing a prompt. The job will use the prompts from this file and generate output.
- Update the
Cleanup
To clean up your resources to avoid incurring more charges, follow these steps:
- Delete any unused SageMaker Studio resources.
- (Optional) Delete the SageMaker Studio domain.
- Verify that your training job isn’t running anymore. To do so, on your SageMaker console, choose Training and check Training jobs.
- If you created a HyperPod cluster, delete the cluster to stop incurring costs. If you created the networking stack from the HyperPod workshop, delete the stack as well to clean up the virtual private cloud (VPC) resources and the FSx for Lustre volume.
Conclusion
In this post, we demonstrated how to fine-tune large models such as DeepSeek-R1 671B using either SageMaker training jobs or SageMaker HyperPod with HyperPod recipes in a few steps. This approach minimizes the complexity of identifying optimal distributed training configurations and provides a simple way to properly size your workloads with the best price-performance architecture on AWS.
To start using SageMaker HyperPod recipes, visit our sagemaker-hyperpod-recipes GitHub repository for comprehensive documentation and example implementations. Our team continually expands our recipes based on customer feedback and emerging machine learning (ML) trends, making sure you have the necessary tools for successful AI model training.
About the Authors
 Kanwaljit Khurmi is a Principal Worldwide Generative AI Solutions Architect at AWS. He collaborates with AWS product teams, engineering departments, and customers to provide guidance and technical assistance, helping them enhance the value of their hybrid machine learning solutions on AWS. Kanwaljit specializes in assisting customers with containerized applications and high-performance computing solutions.
 Arun Kumar Lokanatha is a Senior ML Solutions Architect with the Amazon SageMaker team. He specializes in large language model training workloads, helping customers build LLM workloads using SageMaker HyperPod, SageMaker training jobs, and SageMaker distributed training. Outside of work, he enjoys running, hiking, and cooking.
 Anoop Saha is a Sr GTM Specialist at Amazon Web Services (AWS) focusing on generative AI model training and inference. He partners with top frontier model builders, strategic customers, and AWS service teams to enable distributed training and inference at scale on AWS and lead joint GTM motions. Before AWS, Anoop held several leadership roles at startups and large corporations, primarily focusing on silicon and system architecture of AI infrastructure.
 Rohith Nadimpally is a Software Development Engineer working on AWS SageMaker, where he accelerates large-scale AI/ML workflows. Before joining Amazon, he graduated with Honors from Purdue University with a degree in Computer Science. Outside of work, he enjoys playing tennis and watching movies.